Are You Wanting To Become a Pilot?
Find Out How to Save Hundreds to Thousands of Dollars When it Comes to Your Flight Training!

Recent Posts

Why Are Helicopters So Loud? A Pilot Explains


There is no doubt that a helicopter is a loud machine. MedEvac, police, news, and military helicopters seem to always be in the sky around us, and even inside our homes we can still hear them, but why are they so loud? Surely there must be ways for the manufacturers to reduce their noise!?

The loudest noise on a helicopter is produced by aerodynamic vortices created by each main rotor blade as it rotates through the air. When the following blade hits those vortices’ it creates a loud slap or snap sound. The tail rotor & engines also add to the noise signature of each helicopter.

All around the world, there is ongoing research to make the latest generation of helicopters quieter but in the meantime what is it that creates so much noise in these machines?

What Makes Helicopters So Loud?

There are three main areas on a helicopter that create noise and depending on where you are in relation to the helicopter will depend on which part you hear the loudest:

  • Stood Close By – The engine will be the noisiest part of the helicopter
  • Helicopter Approaching Overhead – The main rotor will be the noisiest part of the helicopter
  • Helicopter Overhead – The main & tail rotors will be the noisiest parts of the helicopter
  • Helicopter Passed Overhead – The engine will be the noisiest part of the helicopter
    Source: Airbus Helicopters

To understand how each area creates the noise lets break each area down:

How Do Helicopter Main Rotors Make Noise?


Almost everything you hear from a helicopter is aerodynamic noise. Reduced pressure on the top of the main rotor blade draws air upwards producing a vortex. The blade tip vortex is then directed downwards. When other rotor blades subsequently come into contact with these vortices, the ‘chopping’ or throbbing noise that is characteristic of helicopters is produced.” –
Karen Mulleners, DLR Institute of Aerodynamics and Flow Technology


The DLR Institute of Aerodynamics and Flow Technology has been doing some incredible research in collaboration with many agencies, manufacturers, and universities around the world in noise reduction in helicopters.

Some of their research has really helped to pave the way for designers to create helicopter parts that dramatically reduce the noise they produce.

As noted, the main noise producer on a helicopter is the main rotor. We have all heard the deep thumping sounds of the Bell Huey or Boeing Chinook well before we see them, but what is that sound created by exactly?

As a rotor blade passes through the air is spills vortices off the back and tip of it. Each rotor blade creates two areas of sound:

Blade Vortices:

The vortices created off the back of each main rotor blade produce an aerodynamic condition called BVI – Blade Vortex Interaction. As the vortices leave the trailing edge of the main rotor blade they get hit by the next rotor blade coming round. When the next blade hits each vortex it creates a snap or slap sound.

Because vortices are created down the length of the blade there is a wall of vortices in the path of the next blade. Each vortex that gets hit creates a sound. The culmination of this sound increases its volume.

The fewer main rotor blades there are on a helicopter, the larger each blade has to be to create enough lift to enable the helicopter to fly. These larger blades create larger vortices behind each blade, therefore as each vortex is intercepted by the next blade the louder, and deeper the slap.

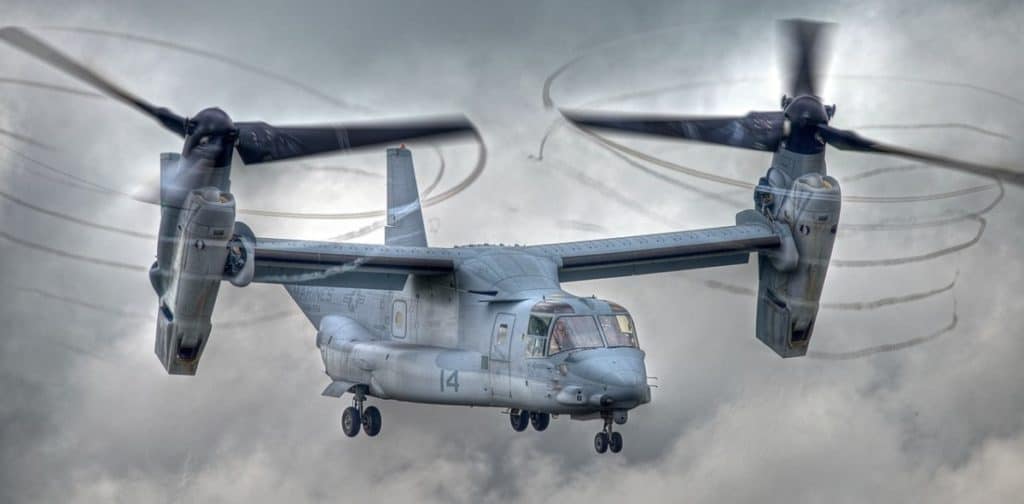
This is the reason why the large blades on Huey’s (with only two blades) and Chinooks (with only 3 blades per rotorhead) create such deep sound that travels for miles.

Blade Tip Vortices:

Blade tip vortices are just what they sound like. They are the vortices that are created around the very tips of each main rotor blade. These can be easily seen on a helicopter as it flies in humid air:

Tip Vortices On Bell/Boeing V22 Osprey – Source: Source: Peter Gronemann

These tip vortices create many problems for helicopter designers but the two main sound-producing problems occur when:

1. The tip vortices are intercepted by another main rotor blade, like the BVI mentioned above, and when they interact with the tail rotor.

Below shows a digital simulation of how the tip vortices interact around the helicopter:

Main Rotor Blade Tip Vortices – Source: DLR

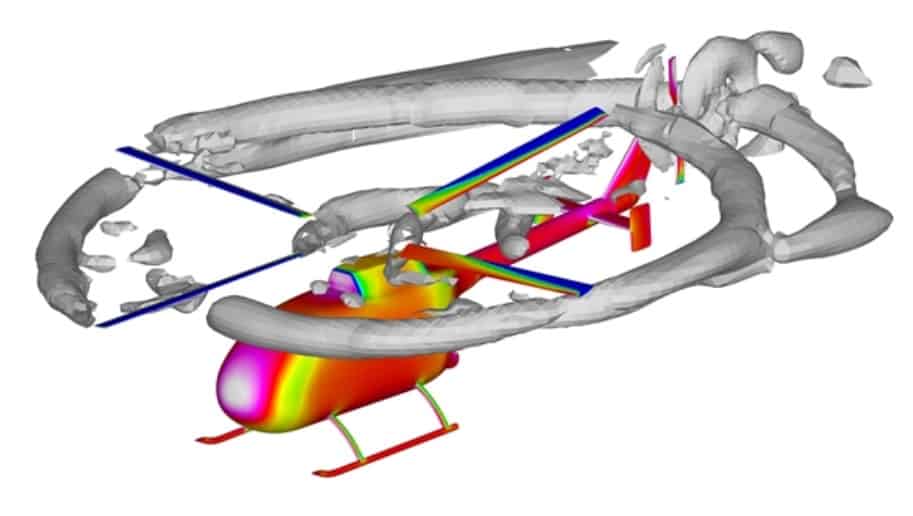
2. When the helicopter has long main rotor blades, a main rotor system that rotates fast, or has a high cruise speed, the blade tips can begin to reach the speed of sound on the advancing side of the helicopter. As the advancing blade tip reaches the sound barrier it creates a loud snap, amongst many other aerodynamic problems!

Advancing & Retreating Blades on a Helicopter

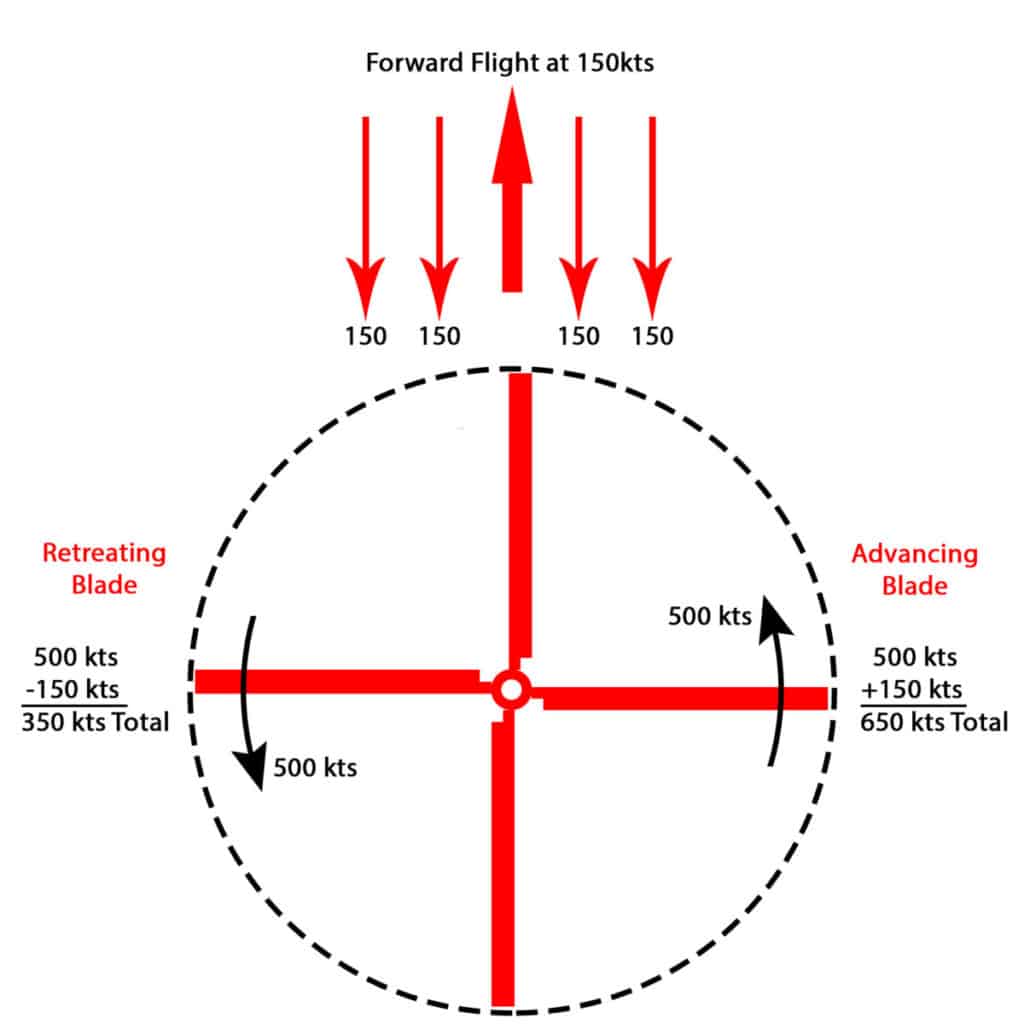
This loud snap is another noise-producing area helicopter designers face in preventing. It is not as common as BVI because designers purposely try and avoid the blade tips reaching this speed because of the high loss of lift it creates when it reaches the sound barrier, but as helicopters are designed to go faster and faster, this problem becomes more applicable.


Join My Newsletter & Get Great Tips, Information and Experiences To Help You Become a Superb Pilot!

* indicates required
Your Interest: *

How Do Helicopter Tail Rotors Make Noise?

Tail rotors create noise just like the main rotor with each blade leaving vortices and the next blade impacting them. This tail rotor BVI creates noise but at a higher frequency because of the higher rotational speed and smaller length of each tail rotor blade.

The tail rotor is also subjected to disruption from the main rotor vortices as they descend backward and downwards from the main rotor. The vortex simulation model above show’s how the main rotor vortices flow into the path of the tail rotor blades which causes them to have secondary BVI on each tail rotor blade, causing noise.

To help combat this noise there have been several very unique designs to helicopters over the decades that all aim to increase tail rotor performance and cut noise levels. These are the most noticeable designs:

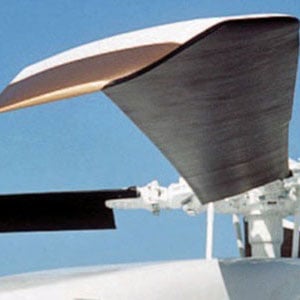
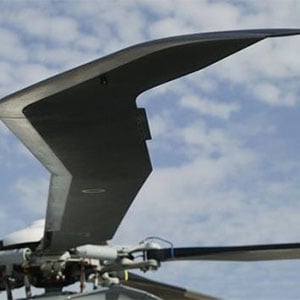
Airbus/Eurocopter Fenestron:

An Airbus EC130 – Source: Prayitno

The Fenestron is a trademarked Anti-Torque system used on many Eurocopter, now Airbus Helicopters.

This anti-torque system works by placing a multi-bladed fan type of tail rotor system within a duct in the tail of the helicopter. The duct is integrated into the tail boom and is usually made of a fiberglass skin.

The fan unit is made up of between 8-18 blades, depending on the aircraft model, and is of a much smaller diameter than a conventional tail rotor system.

The Fenestron Anti-Torque System – Source: Christoph Hansa

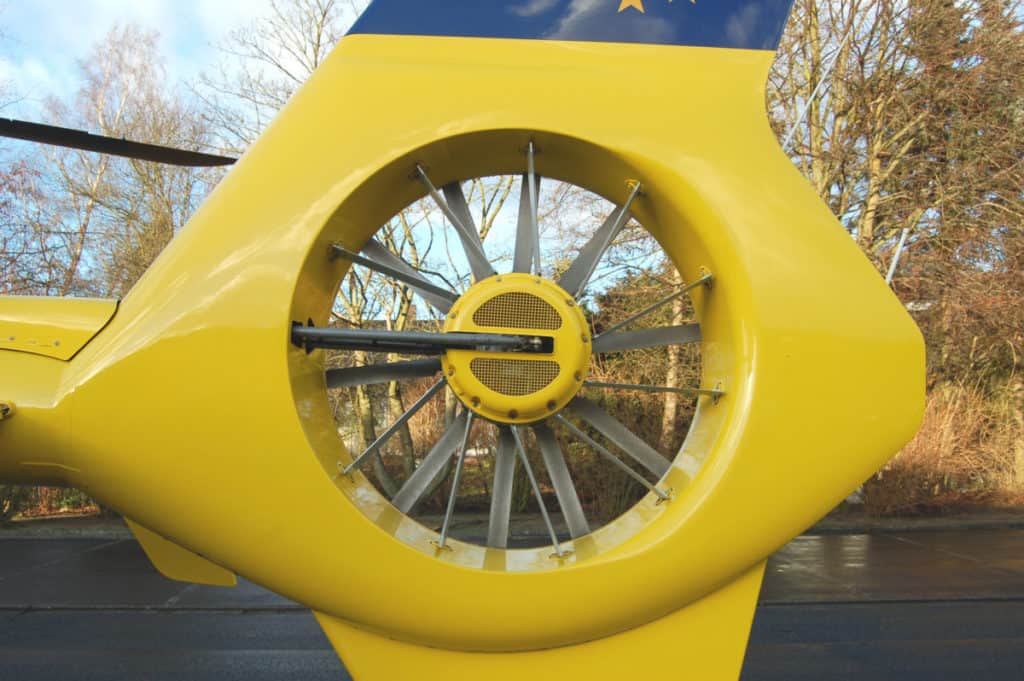
The Fenestron design allows for several improvements over a regular tail rotor by:

  • Creating smaller tip vortices on the ends of the fan blades to reduce the amount and size of each vortex, resulting in quieter snaps as vortices are intercepted by the next fan blade
  • Having more blades, the length and width of each fan blade can be reduced thus creating smaller vortices for the following blade to interact with
  • The shrouded design helps to channel the main rotor vortices away from the Fenestron fan resulting in fewer vortices being hit by the Fenestron fan and creating noise

MD Helicopters NOTAR

An MD Helicopters 902 Explorer – Source: Mike Burdett

The patented NOTAR (NoTailRotor) system from MD helicopters does away with the conventional tail rotor altogether.

The NOTAR system comprises of an engine-driven, variable pitch fan that is mounted perpendicular inside the tail boom to produce large volumes of low-pressure air that exit through horizontal slots along the right-hand side of the tail boom and via a rotatable ‘Jet Thruster’ at the end of the tail boom.

As power is increased when the collective is raised, the pitch on the fan blades is increased to produce more airflow to counteract the increased torque.

  1. Air Intake for Fan
  2. Variable Pitch Fan
  3. Tail boom with Horizontal Coanda Slots
  4. Vertical Stabilizers
  5. Direct Jet Thruster
  6. Main Rotor Downwash Path
  7. Cross-Section of Tail boom
  8. Anti-Torque Thrust
Source: Voytek S

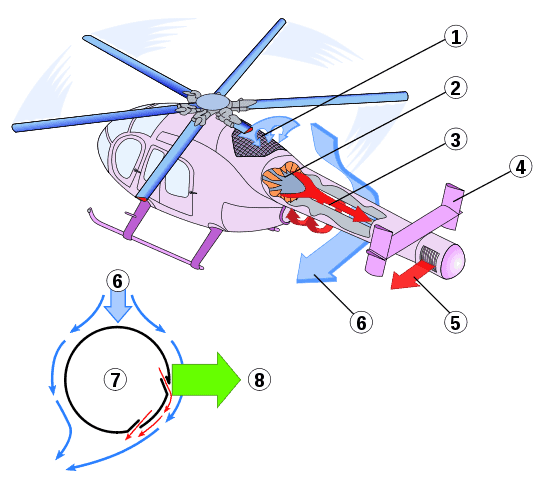
This system uses utilizes the Coanda effect to create an anti-torque to maintain yaw control of the helicopter. This system is very similar to the Airbus Fenestron as it uses a multi-bladed fan for creating airflow, the added benefits to this design are that the fan is installed inside the tail boom allowing it to stay completely isolated from any main rotor vortex interaction and helps to muffle or reduce the noise generated by the fan BVI.

Bell Helicopter EDAT

The EDAT or Electrically Distributed Anti-Torque system is the latest design development from Bell Helicopter.

The 4 fan unit uses independently controlled motors that adjust their speed to control the thrust they produce. Supplied by two transmission-driven electrical generators, the motors adjust the speed of each 4 bladed-propeller to match the anti-torque required by the helicopter.

This EDAT system helps to reduce noise in the following ways:

  • 4 small blades on each motor create small vortices for the next blade to interact with
  • Constantly changing speed changes the size of each blade vortex, thus reducing is the volume of snap when intersected
  • Minimal propeller rotation at low anti-torque requirements creates fewer vortices produced
  • Shrouded fan casing helps to divert main rotor vortices away from the 4 propellers

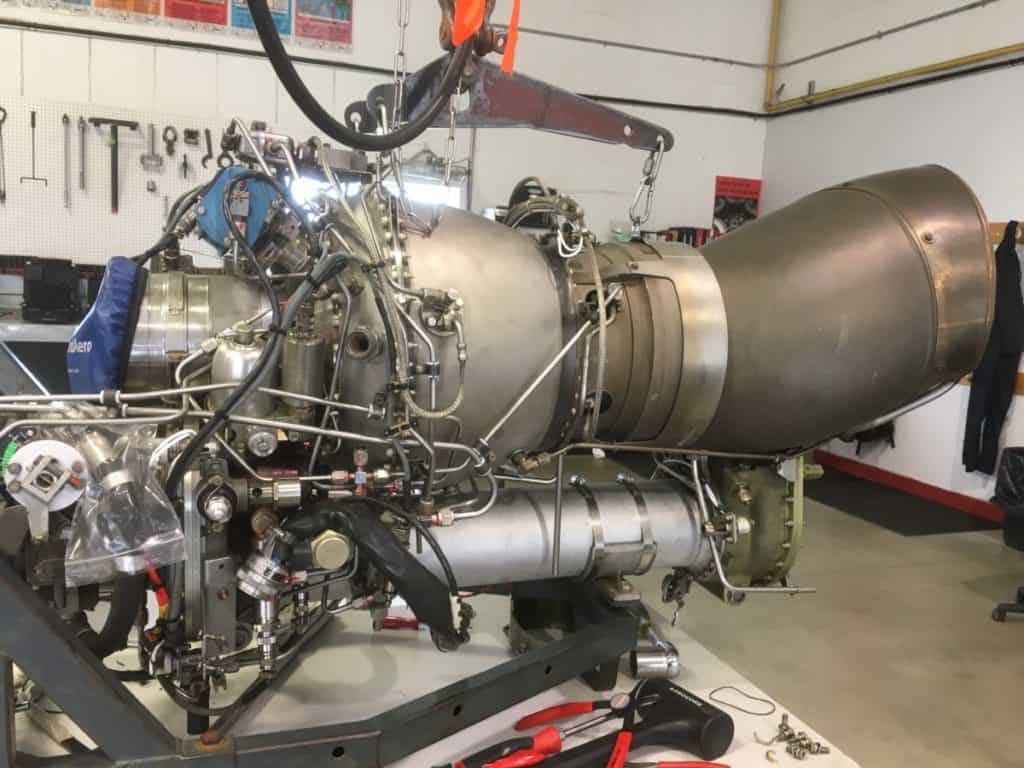
How Do Helicopter Engines Make Noise?

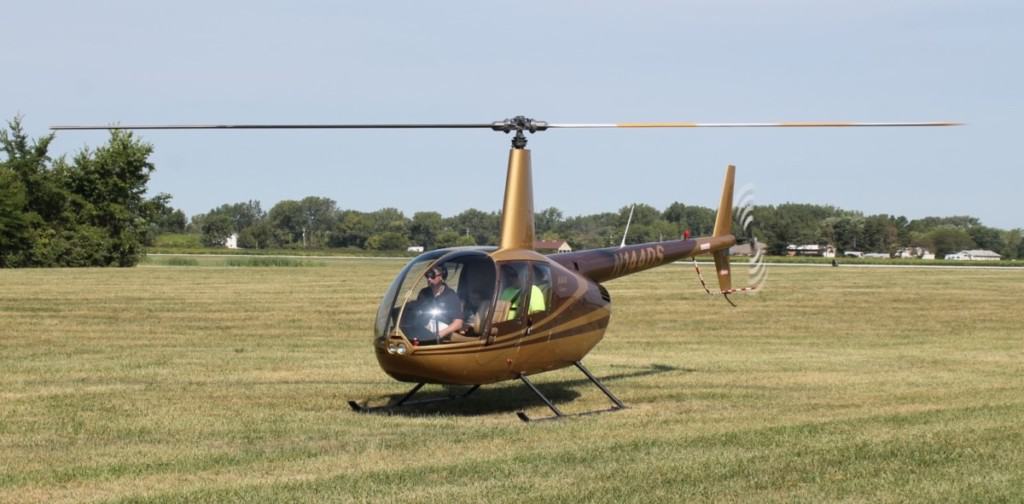
There are two types of engines used in helicopters. The piston engine, used in smaller helicopters up to around 4-5 seats, and then the Turboshaft Gas Turbine engines which are used in all sizes of helicopters.

The piston engines generally do not produce much noise pollution. With attached mufflers, they are not much different to an older car when stood next to a running helicopter.

A Gas Turbine Turboshaft Helicopter Engine

The gas turbine engines are a whole different animal. When a helicopter is running and about to lift off, the noise levels can be well over 100db which can really do damage to a person’s hearing, even for a short period, let alone a pilot with decades sitting inside of one!

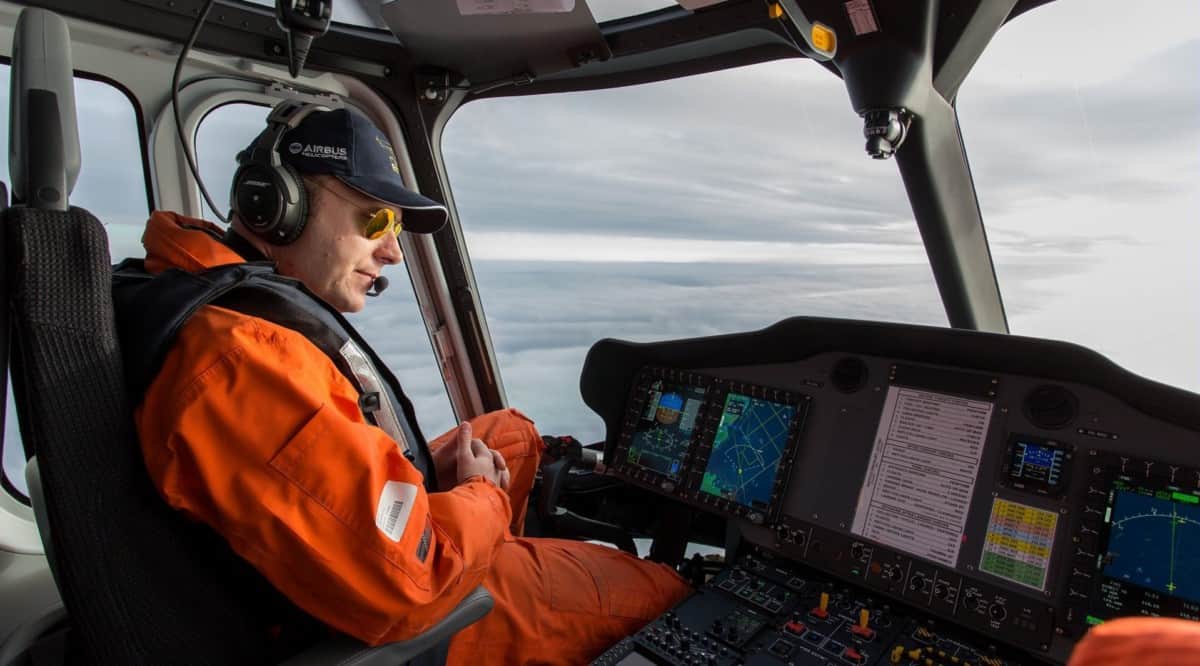
Because of this, when I fly I wear:

The high-frequency noise and decibel levels created by gas turbine engines really do warrant hearing protection.

Helicopter engines produce the majority of their noise in three main areas:

  • The Air Intake
  • The Power Turbine
  • The Exhaust

Air is drawn into the front of the engine by a compressor or series of compressors. The volume of air required by even the smallest gas turbine engine is phenomenal and the noise of the air going in, coupled with the noise of the compressor squeezing the air results in very high-frequency sound levels.

As air exits a helicopter engine it is passed through the Power Turbine. This draws the energy out of the passing airflow to turn the main transmission. These power turbines rotate at insane RPM. The power turbine in the AS350 B2 Astar that I fly turns at over 51,000 rpm at full power!

The Arriel 1D1 Turboshaft Engine on an AS350 B2 Astar Helicopter

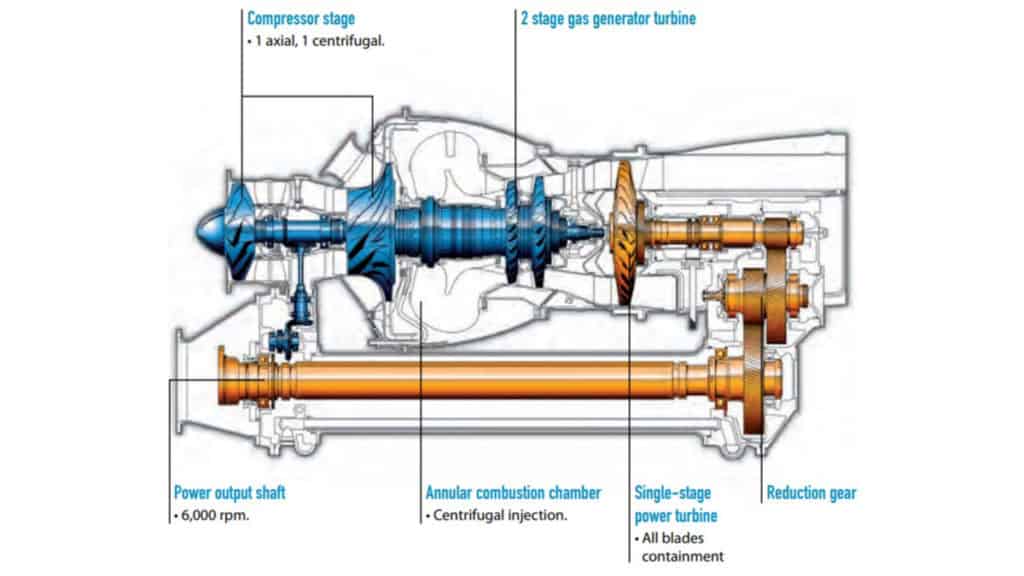
This is a major producer of high frequency noise from the engine!

The last noise-producing area is the gas exiting the exhaust system. The exhaust on a helicopter engine is larger and creates a lower tone in its noise pollution, but because of the huge quantities of gas exiting, it does create large amounts of noise.

Due to the nature and speeds of how the gas turbine engine operates designers are really at the end of the envelope of noise reduction. It is going to take the next leap in powerplant technology to reduce the noise from a helicopter engine!

How are Helicopters Being Made Quieter?

As pressure for quieter helicopters is coming from all angles the job of the designers to produce quieter machines is right up at the top of the specification list!

The quieter a helicopter can be made, the more markets it will appeal to leading to better sales. Here are just some of the ways in which helicopters have been designed to reduce their noise footprint:

More Blades

More main and tail rotor blades mean the blades can be smaller. Smaller blades produce smaller vortices that make less noise when intercepted by the next blade.

Shorter blades mean the tips travel slowly further reducing the blade tip vortices.

Slower Main Rotor RPM

Over the decades engineers have dabbled with slowing down the main rotor to reduce the size and amount of vortices being produced along the blade and especially at the blade tip.

Airbus/Eurocopter X3 – Source: Bernd Brincken

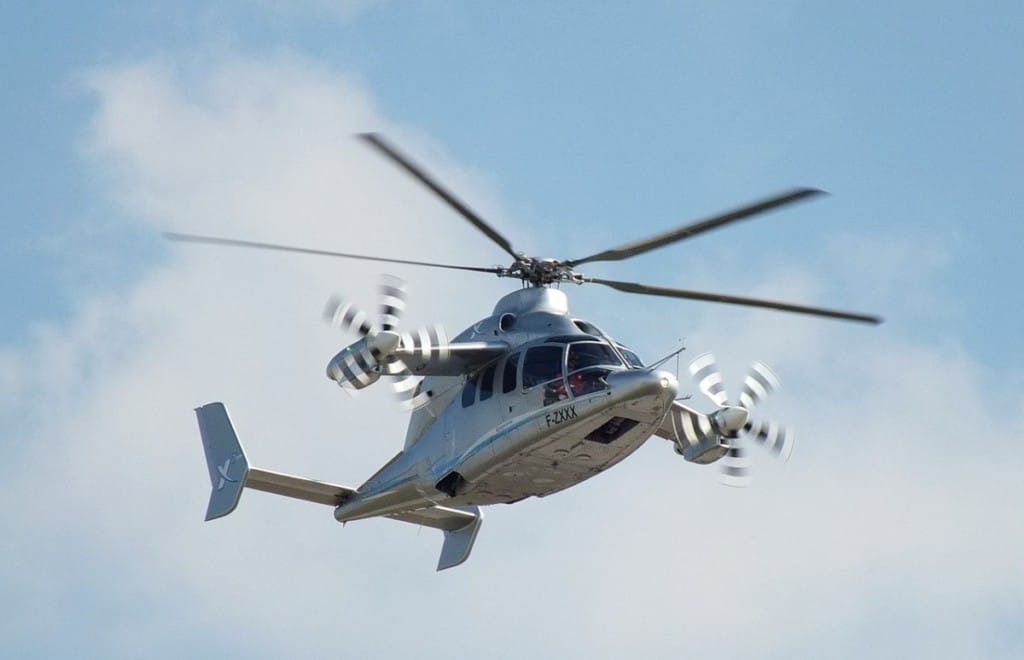
The current development of hybrid/compound helicopters like the Airbus/Eurocopter X3 have been testing the slowing of main rotor rpm when at higher cruise speeds to prevent the main rotor tips from breaking the sound barrier.

As of yet, there is no helicopter in production that has a varying-speed main rotor. Varying the speed is a complex area that changes many aerodynamic and vibration conditions, but as technology and design evolve, this may be a feature we see in future helicopter designs.

Active Rotor Blades

An area that is getting some current testing and development is called ‘Active Rotor Blades’. One of the pioneers leading the way in this field is the DLR Institute of Aerodynamics and Flow Technology in Germany.

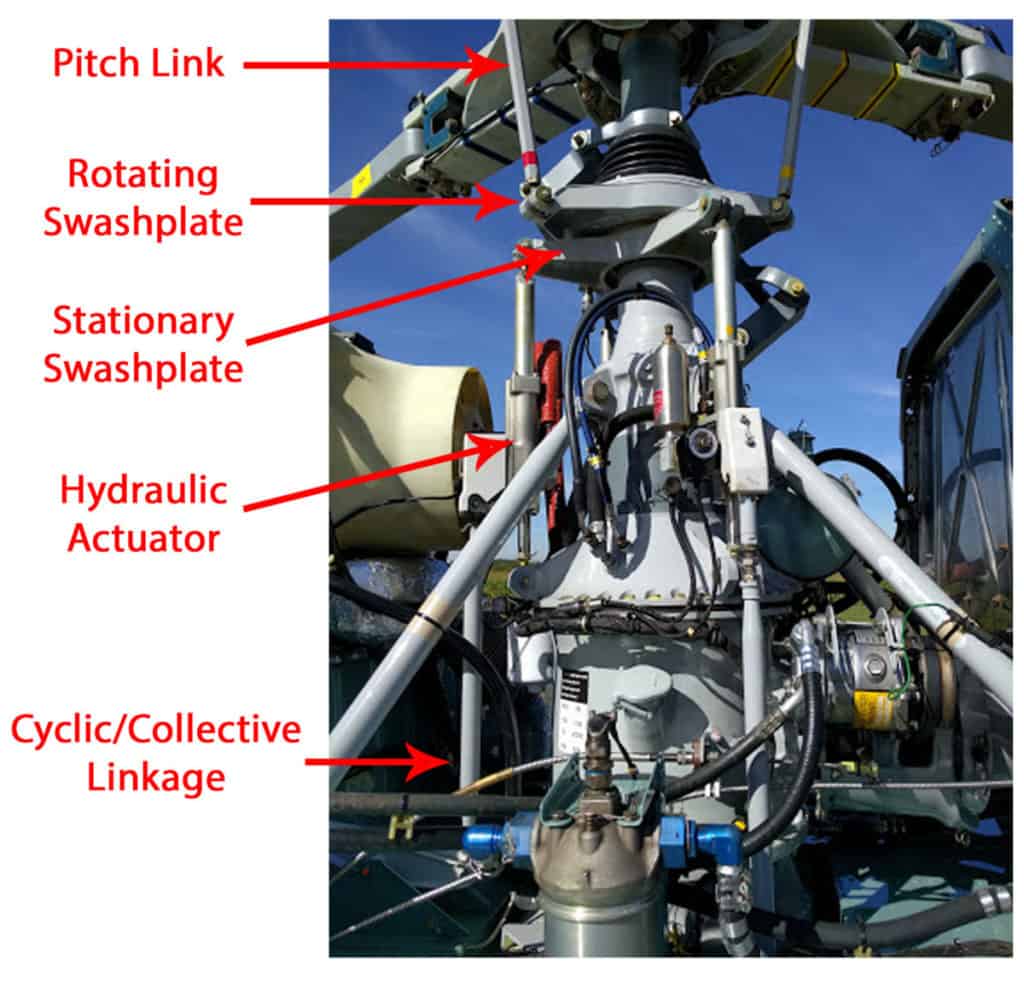
The design uses multiple swashplates to control the pitch of each individual rotor blade during its rotation around the helicopter.

In a conventional helicopter, there is only one swashplate and the rotor blades are controlled as a group, but by using a multi-swashplate system the engineers have been able to independently control each rotor blade leading to a noise reduction by 30% over the flight envelope.

Active Rotor Blade Control Reducing Noise By 30% & Vibration By 80% – Source: DLR

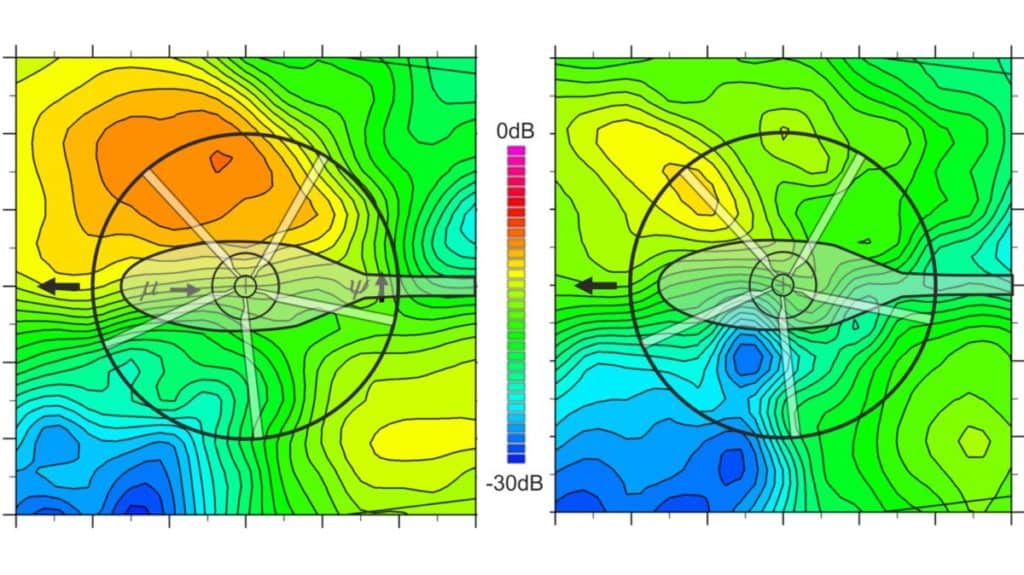
This system is still in the development phase but it would not surprise me to see this or a derivative coming into production over the next few decades.

Blade Tip Design

You may have seen this already if you have a keen eye when wandering around airshows etc. Blade tip design has created some funky looking main rotor blades over the last few decades all with the aim of decreasing rotor tip vortices and their associated aerodynamic problems.

Augusta’s BERP Tip Blade
Sikorsky’s Droop Tip Blade
Airbus’s Blue Edge Blade

One of the major problems created by the tips of main rotor blades is called ‘Compressibility’ and it leads to increased noise, drag, vibration, power reduction, and blade twisting. By altering the shape of the blade tip engineers have been able to reduce the effect of compressibility to allow the blades to work more efficiently and produce less noise.


If you wish to learn more about blade compressibility you can find a great article written by Phil Croucher Here at HelicoptersMagazine.com


Tail Rotor Design

As mentioned above in the tail rotor section, helicopter manufacturers are constantly looking to improve the design of the anti-torque system on their helicopters.

Whether it be a ducted fan, electric motor, or no tail rotor system at all this area of helicopter design will always lead to some interesting innovations.

Flight Profiles & Procedures

One of the simplest ways to reduce helicopter noise is to alter how it is being flown. Certain flight maneuvers cause the noise produced by the main rotor to be extremely loud and this is actually one of the main reasons for noise complaints when flying over populated areas.

The noise created by Blade Vortex Interactions are really prominent during approaches to land so by adjusting the approach to have a steeper angle this can dramatically reduce a helicopter’s noise footprint. This is just one example.

Yet another testing program from the DLR Institute of Aerodynamics and Flow Technology in Germany has led to recommendations for helicopter manufacturers and operators to adopt:

Lower rotor noise thanks to a modified approach path – DLR on the way to the silent helicopter

To Finish

Helicopters are noisy machines and there is no getting away from that for the near future. Whether it is the noise created by the blade vortex interactions, blade tip compressibility, main rotor vortex interaction on the tail rotor, or the power turbine within the engine, the noise is there.

But by trying to reduce the noise bit by bit on every component an overall noise reduction of the helicopter is welcomed news to those who live under active helicopter flying areas!

Further Reading

If you would like more information on articles related to helicopters, please take a read of the ones listed here:

What Visa Do You Need to Learn to Fly in the U.S.?


If you are wanting to learn to fly in the U.S. but you are not a U.S. citizen then you are going to need a visa. I was in the same boat as you are right now back in 2004 when I wanted to leave the UK and fly in the States.

Back then the information was not as freely available on the internet as it is now but it’s still not the best. This guide was written to help you understand everything you need to know about the visas needed for learning to fly in the U.S.

International students wishing to learn how to fly in the U.S. need either an M-1 or F-1 visa. The M-1 visa allows training only, while the F-1 visa allows training & then employment as a flight instructor. The M-1 visa is valid for 12 months, the F-1 visa is valid for 18 months.

Getting a visa to be able to train in the U.S. is a pretty straightforward process but there are several things you need to know about each type of visa before you begin looking at the schools you wish to train at.

What is a Visa?

A Visa or Visa Waiver is an application-based process that grants you permission to stay, study, and sometimes work in the United States.

There are many types of visas available to persons entering the U.S. and ensuring you have the correct one will prevent you from possibly being arrested and deported. Many people visit the U.S. on their passport which is a visitor visa, this allows that person to visit and then leave, but not to study, work or earn compensation.

To learn to fly there are two visas that are applicable and each has its own rules for its use. The visas are:

  • M-1 Visa
  • F-1 Visa

Let’s take a look at each one…

M-1 Visa

This is the most common international student visa available for use at most flight schools across the U.S. It is a visa that allows a student to undertake flight training and it is valid for 12 months. If further training is required the student can apply to the Department of Homeland Security to have the visa extended for a further 12 months.

However, once the flight training is completed or the visa expires the student must leave the U.S. This visa does not allow the student to work while training or when their training is completed.

The M-1 visa is for flight training only!

Once an M-1 visa has been issued it cannot be upgraded to an F-1 visa!

This visa is really good for students who wish to gain specialized flight experience, pilot certificates, or ratings which they will then convert back in their home country.

F-1 Visa

The F-1 visa is aimed at the career pilot who wishes to train and then work as a flight instructor for the duration of their visa. This was the route that I took in 2006, although back then the program was different and my visa was called a J-1 visa.

Because this visa allows students to work after their training, it requires a deeper background security check, financial proof and it is only accessible through a handful of flight schools.

For a flight school to be able to offer the F-1 visa it has to be accredited by the Department of Homeland Security and run FAA-approved Part 141 training programs. The schools also need to be able to provide student services like accommodation, employment, and assistance to all its international students.

An international flight student on an F-1 visa will be the responsibility of the student program manager at the school who will need to liaise with that person for the duration of their stay in the U.S.

Below is a list of the Only FAA Accredited Part 141 Schools Approved for the F-1 Visa:

SCHOOLLOCATIONAIRCRAFTWEBSITE
FlightSafety AcademyFloridaFWLink
Phoenix East AviationFloridaFWLink
Aviator CollegeFloridaFWLink
Aero CadetFloridaFWLink
Academy of AviationNY, NC, GAFWLink
Mauna Loa HelicoptersHawaiiRWLink
Hillsboro Aero AcademyOregonFW & RWLink
Embry-Riddle
Aeronautical University
FL, AZFW & RWLink
Pelican Flight TrainingFloridaFW & RWLink
FW = Fixed Wing (Airplane) & RW = Rotary Wing (Helicopter)

The F-1 visa allows a student 18 months from the day of entry into the U.S. to complete any flight training they wish. Most students will aim to become a CFI – Certified Flight Instructor.

Upon gaining their CFI certificate the student should begin to look to gain employment at the school in which they trained (internship) or at any other flight school in the country (externship).

Once a job offer has been accepted the student can then train to get additional instructor ratings like the Multi-Engine Instructor under 3-month extensions known as CPT (Curricular Practical Training). Extensions can only be applied for up to a maximum of 11.5 months total.

Up to 90 days before the completion of the CPT and with a Job offer the student can then apply for an OPT (Optional Practical Traning) extension which will then grant an additional 12 months in which to work as a flight instructor and gain experience.


Join My Newsletter & Get Great Tips, Information and Experiences To Help You Become a Superb Pilot!

* indicates required
Your Interest: *

Once the visa expires that person will have 60 days to leave the U.S. unless they have gained an additional visa to allow them to legally stay and work. This is usually only granted through winning the ‘Green Card Lottery’ (Electronic Diversity Visa Program), marriage, or starting a business. Those are all topics you will need to investigate further if this is something that interests you.

Trying to stay in the U.S. legally after your visa expires is very difficult to do! I believe the current wait time for Permanent Residency applications is over 8 years!

Learn More
Try These Articles:
* Flight School Requirements – Are There Any For Joining?
* Flight School Reputation – Does It Matter Where You Train?
* Flight School: Full-Time Vs Part-Time Training
* Do Flight Schools Drug Test Students & Instructors?

How Do You Apply for M-1 or F-1 Visa?

The first step is to decide which visa you require. If you are only flight training with the plan to return back to your home country to work, then the M-1 visa is best suited to you.

You can begin to look at the many flight schools across the country that offer the M-1 visa.

Do not expect a flight school to offer the F-1 visa just because they offer the M-1 visa! They have to be accredited to offer both!

If you wish to pursue a career in aviation and are looking for a complete flight training program then you will need to contact the schools in the list above as they are the only schools approved for the F-1 visa (at the time of writing this).

Once you have the visa type selected then you need to begin a thorough investigation into each flight school you wish to train at. It is an expensive career you are about to undertake and it needs accurate attention and planning.


I highly recommend you take a look at the ‘Further Reading’ section at the end of this article as it has many more articles to help you in your flight school research!


Once you begin to narrow down the flight schools to a shortlist you will need to speak to their staff members that deal with international students. Stay away from schools that do not have considerable experience with training international students. If they mess up you could be deported, with no flight training or money left in your bank account!

The U.S. Embassy in London, England

No matter which visa you select, the school will have a checklist of tasks and paperwork that you will need to complete before they can issue you an I-20 form that will begin the application for the visa.

Here is a typical visa application process:

STEP 1: Apply to the school for admission into one of their flight training programs and pay any enrollment fees

STEP 2: Submit your details to the TSA under a Training Request – More details can be found Here at the TSA Alien Flight Student Program website (and Yes, international students are referred to as Aliens! Nice Hey!!)

STEP 3: Receive an I-20 Form. Verify all the information is correct and sign it. Pay the I-901 Student and Exchange Visitor Information System (SEVIS) fee ($350US)Click Here For SEVIS Fee Details

STEP 4: Make an appointment at your nearest U.S. Embassy for a visa interview. Pay their fee and get all your documents ready to take with you ($160US)Click Here For Interview Fee Details

STEP 5: Organize your travel details, financials, and home country necessities to get ready for leaving

STEP 6: Arrive in the U.S. – If your school is collecting you from the airport make sure you have this arranged!

STEP 7: Arrive at the school for student orientation and begin your training

This is a very generic list and your chosen school will walk you through their process, forms, and fees to ensure it goes smoothly!


To Help You Even Further Please Feel Free to Download these Free Tools:

  1. Printable .pdf of the steps listed above to help you track your application process
  2. Flight School Cost Comparison tool to help you narrow down your flight school selection

To Finish

If you want to just train, gain specialized experience, and head home, then the M-1 visa is the right one. If you wish to learn and gain extensive flying experience before moving to another country or heading back home to convert your licenses, then the F-1 is the visa choice for you!

My flight training and instructing days were some of the best years of my life and getting the visa and school selected was a simple task providing you stay on top of paperwork and correspondence.

I prepared my own binder that everything went into. Receipts, emails, checklists, so that when I went to the U.S. Embassy or arrived at the border I had everything in one place and it made the application seamless. I highly recommend you do the same!

Do You Need a Degree To Become a Pilot? I Didn’t!


For many people wanting to become a pilot the answer to whether they need a college degree to be successful in aviation is sometimes hard to find. Scouring the job boards for pilot jobs shows degrees are required and then other times not. So what is the answer? Do flight students need a degree before learning to fly?

A degree is required to be a pilot in the military. In civilian aviation, it is not an FAA requirement however, some employers may require a degree but that’s a company-specific policy. A degree can help show an employer your abilities, dedication & management skills to help beat other candidates.

I do not have a college degree, and I know many pilots in very different flying careers who do not have a degree so why do some companies mandate that you have a college degree?

Do You Need A Degree To Be A Pilot?

Nope, Nada, Nej, Net, Não. No matter the language you speak there is no FAA requirement to have a degree to become a pilot.

To become a pilot, all you need to do is have the money to pay for flight training, the knowledge to pass the written examinations, the practical flight experience to pass a flight test (also known as a ‘Checkride’), and the health to pass a medical examination for the class of medical sought.
That’s it!

This is applicable to becoming a pilot of a fixed-wing (airplanes), rotary-wing (helicopters), balloon, glider, drone, and for all certificate types:

  • Sport Pilot Certificate
  • Recreational Pilot Certificate
  • Private Pilot Certificate
  • Commercial Pilot Certificate
  • Airline Transport Pilot Certificate
  • Certified Flight Instructor Certificate

For more information regarding medical certificates and pilot training costs please see the ‘Further Reading’ section at the very bottom of this article


So why do people tell me I need a degree to be a pilot? This comes down to the requirements of individual companies. Many companies like to employ pilots who have been to college and successfully completed a degree program because it proves to the employer that the candidate has proven the following:

  • Dedication
  • Work Ethic
  • Self-Management
  • Time-management
  • Mental Aptitude
  • Responsibility
  • This list goes on…

But, this does not mean that a person who has not got a degree is not capable of this, far from it, but for some recruiters, this helps to speed up the recruitment process for them.

In my opinion, I do not think having a degree is necessary to be a pilot at all. I have flown with very clever flight students with multiple degrees and they would never make it as a pilot. But then on the other end, I have flown with people with very little education and they will and have become incredibly talented pilots, so a degree does not prove anything.


Join My Newsletter & Get Great Tips, Information and Experiences To Help You Become a Superb Pilot!

* indicates required
Your Interest: *

What a person needs to understand about learning to become a pilot is that it does require a good portion of mental aptitude to be able to learn and understand the physics, math, physiology, and law that every pilot must learn to pass the written and practical flight tests.

I left school and went on to complete a 5-year technical engineering apprenticeship and I am good at math and physics, yet it took me a while to get my head around aviation theory! It is a tough slog in the beginning but there are so many incredible ground school training programs out there that really help you to picture, process, and understand the theory.

One such training program is Rod Machado’s range of pilot training. Rod has been flying and teaching for decades and his training material for all pilot certificates works very well.
This is the reason it is my number one recommendation for student pilots to get.


You can find out more information about the Rod Machado Training Courses HERE at Rodmachado.com:


So, when it comes to looking for a career as a pilot, the individual company you are applying for will dictate the education level required.

For example,

Having a quick look around some of the most common aviation recruitment websites I have found the following:

  • FedEx requires its pilots to have a degree
  • American Airlines has no degree requirement
  • Delta Airlines requires its pilots to have a degree
  • Alaska Airlines requires a high school diploma or equivalent

Here are some Examples of Job Postings:

Airline Pilot:

Here is an excerpt of the pilot requirements for American Airlines:
(Link To AA Pilot Recruitment Page):

  • Excellent communication skills and quick and accurate decision making
  • Close attention to detail
  • Minimum age of 23
  • Ability to work varying hours of the day or night, on weekends and holidays
  • Must be able to secure appropriate airport authority and/or Customs security badges
  • Fulfillment of FAA criminal background checks
  • Ability to learn and work with PEDs
  • Distance vision corrected to 20/20 and near vision corrected to 20/40 or better in each eye
  • Current Unrestricted Airline Transport Pilot (ATP) rating (multi-engine)
  • Valid FCC Restricted Radio Telephone Operator Permit
  • Valid First Class Medical Certificate
  • Flight time in accordance with all FAA requirements
  • Must be able to fluently speak and understand English
  • Must have the right to work in the United States
  • Additionally, we require all of our pilots to have a valid passport and documentation allowing for entry into the United States after an international flight
Source: Mike Burdett

EMS Helicopter Pilot:

Here is an excerpt of the pilot requirements for an EMS Helicopter Pilot with Metro Aviation:
(Link To Metro Aviation Pilot Recruitment Page):

  • FAA Commercial Pilot Rotorcraft Certificate and Instrument Helicopter Rating (Airline Transport Pilot Rotorcraft Preferred)
  • FAA 1st Class Medical (1st Class required at some locations)
  • Total Helicopter Flight Time 2,500 hours
  • Total Pilot-In-Command 1,000 hours
  • Cross Country Flight Time 500 hours
  • Night Flight Time 200 hours, including 50 hours night unaided
  • Instrument Flight Time 100 hours helicopter instrument or simulated flight time
  • Turbine Helicopter 1000 hours
  • Factory-approved or equivalent ground and flight school in assigned helicopter
  • Instrument qualified and current in assigned helicopter(s)
  • 10 hours in type, five(5) of which must be at night
  • Air Medical operations
  • Single Pilot IFR operations
  • Night Vision Goggle operations

Completing a college degree really is a personal choice for every person and depending on the employer you wish to fly for in the future, may dictate whether or not you need to enroll in a degree program.

If you are purely flying for pleasure then no degree is required, however, if you are reading this with a view of wanting to fly in the military then keep reading!

Do You Need A Degree To Fly In The Military?

For many people, the dream of becoming an aviator in the military may have begun the first time they saw a fast jet, ginormous cargo freighter, or a helicopter flying low over the treetops. No matter the dream, each branch of the military has their own requirements to become a pilot.

The only branch to not require a person to have a degree prior to flight school is the U.S. Army.

Read on to find out more about each branch’s pilot requirements…

How To Become a Pilot in the U.S. Army

The U.S. Army only flies helicopters. You can either learn to become a pilot once you have been enlisted and are currently serving or you can utilize their ‘Street-To-Seat’ flight officer recruitment program.

To be eligible for the Street-To-Seat program you must meet the following requirements:

  • High School Diploma
  • 18 years old at the time of enlistment and no older than 33. (Applicants must not have passed their 33rd birthday at the time of enlistment.
  • Achieve a qualifying score on the Selection Instrument for Flight Training (SIFT).  SIFT test results are valid indefinitely, as long as verifiable official records exist.  No waivers are available for failure to meet the minimum SIFT score.
  • Earn a minimum of 110 General Technical (GT) score on the Armed Forces Vocational Aptitude Battery (ASVAB) (nonwaivable). The GT score is one component of the ASVAB results.
  • Meet the Active Duty Army’s screening height and weight standards.
  • Take a complete physical exam at a Military Entrance Processing Station (MEPS) and meet entry medical fitness standards as determined by military medical authorities no more than 24 months prior to the date of application.
  • Must also undergo a Class 1A Flight Physical Examination in addition to the one conducted at the MEPS and have results approved by Flight Surgeons at Fort Rucker, Alabama, prior to the selection board.
  • The Flight Physical must be less than 18 months old.

If you are successful in being accepted, your training will follow:

  • 9 Weeks Basic Combat Training
  • 6 Weeks Warrant Officer Candidate School
  • WOFT – Warrant Officer Flight Training

You will progress through training until you graduate from all courses. Only then will you be issued your ‘Wings’.

For more information on becoming a pilot in the U.S. Army, you can find, and direct all your questions to a recruiter.
You can find them HERE at goarmy.com


How To Become a Pilot in the U.S. Navy

The U.S. Navy flies both fixed and rotary-wing aircraft, and now UAVs. Just like the U.S. Army, you can learn to become a pilot by either being an enlisted sailor who can then apply for flight training selection, or you can complete an applicable 4-year bachelor’s degree and apply to enter as an officer.

To be eligible to work as a Navy Pilot or Naval Flight Officer you must meet the following requirements:

  • Completed a four-year bachelor’s degree from a regionally accredited institution in a technical field
  • Be a U.S. citizen; or Legal Permanent Resident (Enlisted)
  • Be between the ages of 17 and 39 to enlist or be between 19 and 42 to become an Officer*
  • Have a qualifying score on the Armed Services Vocational Aptitude Battery (ASVAB) test (Enlisted) or the Officer Aptitude Rating (OAR) and Aviation Selection Test Battery (ASTB) (Officer)
  • Pass the Military Entrance Processing Station (MEPS) medical exam
  • Meet the physical, mental, and moral standards of the Navy

*If you are not yet 18, you need parental consent to join.

If you are successful in being accepted, your training will follow:

  • 13 Week Initial Officer Candidate School (OCS)
  • 6 Week Air Indoctrination Course
  • 22 Week Primary Flight Training
  • Pilots and Naval Flying Officers will then request which type of aircraft they wish to pursue:
    • Jet
    • E2/C2 – Hawkeye
    • Maritime – Multi-Engine
    • Helicopter
    • E6 TACAMO – Airborne Command Post
  • Intermediate Flight Training On selected Aircraft Type – Duration Varies
  • Advanced Flight Training On selected Aircraft Type – Duration Varies

You will progress through training until you graduate from all courses. Only then will you be issued your ‘Golden Wings’.

For more information on becoming a pilot in the U.S. Navy, you can find, and direct all your questions to a recruiter.
You can find them HERE at Navy.com


How To Become a Pilot in the U.S. Marine Corps

All U.S. Marine Corps pilots are officers. You can either become an officer by being an enlisted Marine and applying internally through Platoon Leaders Class (PLC), Officer Candidate Course, Naval Reserve Officers Training Corps (NROTC), or Marine Corps Enlisted Commissioning Education Program (MECEP), or by completing an applicable 4-year bachelors degree and apply to enter as an officer.

To be eligible to work as a U.S. Marine Corps pilot you must meet the following requirements:

  • Completed a four-year bachelor’s degree from a regionally accredited institution in a technical field
  • Be a U.S. citizen; or Legal Permanent Resident (Enlisted)
  • Be between the ages of 18 and 28 (Candidates must be commissioned prior To their 28th birthday)
  • Have a qualifying score on the Armed Services Vocational Aptitude Battery (ASVAB) test (Enlisted) or the Officer Aptitude Rating (OAR) and Aviation Selection Test Battery (ASTB) (Officer)
  • Pass the Military Entrance Processing Station (MEPS) medical exam

If you are successful in being accepted, your training will follow:

  • 10 Week Initial Officer Candidate School (OCS)
  • 6 Week Air Indoctrination Course
  • 20-30 Week Primary Flight Training
  • Pilots will then request which type of aircraft they wish to pursue:
    • Strike Jet
    • Strike Jet / TS
    • Multi-Engine
    • Helicopter
  • Intermediate Flight Training On selected Aircraft Type – Duration Varies
  • Advanced Flight Training On selected Aircraft Type – Duration Varies

You will progress through training until you graduate from all courses. Only then will you be issued your ‘Golden Wings’.

For more information on becoming a pilot in the U.S. Marine Corps, you can find, and direct all your questions to a recruiter.
You can find them HERE at Marines.com


How To Become a Pilot in the U.S. Air Force

All U.S. Air Force pilots are officers. You can either become an officer by being enlisted and applying internally through the Air Force Reserve Officer Training Corps (AFROTC), attend the United States Air Force Academy (USAFA) or by completing an applicable 4-year bachelor’s degree and applying to enter as an officer.

To be eligible to work as a U.S. Air Force pilot you must meet the following requirements:

  • Completed a four-year bachelor’s degree from a regionally accredited institution in a technical field
  • Be a U.S. citizen; or Legal Permanent Resident (Enlisted)
  • Be between the ages of 18 and 33 to being flight training
  • Have a qualifying score on the Armed Services Vocational Aptitude Battery (ASVAB) test (Enlisted) or the Officer Aptitude Rating (OAR) and Aviation Selection Test Battery (ASTB) (Officer)
  • Pass the Military Entrance Processing Station (MEPS) medical exam

If you are successful in being accepted, your training will follow:

  • 9.5 Week Initial Officer Candidate School (OCS)
  • 6 Week Initial Flight Training (IFT)
  • 54 Week Primary Flight Training
  • Pilots and Naval Flying Officers will then request which type of aircraft they wish to pursue:
    • Fighter/Bomber
    • Airlift/Tanker
    • Helicopter
  • Advanced Flight Training On selected Aircraft Type – Duration Varies

You will progress through training until you graduate from all courses. Only then will you be issued your ‘Wings’.

For more information on becoming a pilot in the U.S. Air Force, you can find, and direct all your questions to a recruiter.
You can find them HERE at airforce.com


How To Become a Pilot in the U.S. Coast Guard

All U.S. Coast Guard pilots are officers. You can either become an officer by being enlisted and applying internally through the Direct Commission Aviator (DCA) Program, attending the U.S. Coast Guard Academy, or by completing an applicable 4-year bachelor’s degree and applying to enter as an officer.

To be eligible to work as a U.S. Coast Guard pilot you must meet the following requirements:

  • Completed a four-year bachelor’s degree from a regionally accredited institution in a technical field
  • Be a U.S. citizen; or Legal Permanent Resident (Enlisted)
  • Be between the ages of 21 and 27 to being flight training
  • Have a qualifying score on the Armed Services Vocational Aptitude Battery (ASVAB) test (Enlisted) or the Officer Aptitude Rating (OAR) and Aviation Selection Test Battery (ASTB) (Officer)
  • Pass the Military Entrance Processing Station (MEPS) medical exam

If you are successful in being accepted, your training will follow:

  • 17 Week Initial Officer Candidate School (OCS)
  • 6 Week Initial Flight Training (IFT)
  • 22 Week Primary Flight Training
  • Pilots and Naval Flying Officers will then request which type of aircraft they wish to pursue:
    • Multi-Engine
    • Helicopter
  • 20 Weeks of Advanced Flight Training On selected Aircraft Type

You will progress through training until you graduate from all courses. Only then will you be issued your ‘Wings’.

For more information on becoming a pilot in the U.S. Coast Guard, you can find, and direct all your questions to a recruiter.
You can find them HERE at gocoastguard.com

To Finish

The career path you wish to take as a pilot will dictate whether or not you will need a degree. You can fly most civilian aircraft without a degree, but there will be times when companies may mandate it. This usually seems to become more noticeable when there is an abundance of pilots.

Unless you apply to fly the U.S. Army you are going to need a degree. You can either earn a degree before joining the military or by getting accepted into the officer training program and earn your degree during enlistment.

Having a degree can also lead to further aviation-based careers in the future. Management, sales, development, safety, and so many more jobs can be offered to those who have a degree compared to those without.

The bottom line is you do not always need a degree to become a pilot and love your job – I don’t have a degree and I am fine in my chosen career!

Further Reading

If you found this article interesting and would like to keep reading, I highly recommend the following articles from my blog:

How Do Pilots Know Which Runway To Land On?


Sitting in the airport terminal looking out over the vast chaos of a large airport gets people wondering how pilots know what is the right runway to use. Some runways are being used for landing and some for taking off. So how do pilots get the right one?

Runways are identified by large white numbers painted on each end to represent their magnetic heading. Signs, digital & paper airport diagrams, and individual radio frequencies for the navigation systems all help provide additional information to ensure the pilot uses the correct runway.

It is so important that pilots are using the correct runway so how has the global aviation community created ways to help ensure that pilots get it right? Let’s look at the ways pilots identify runways…

How Do Pilots Identifying The Right Runway On The Ground?

When there is only one runway at the airport there can be only two options for the pilot to get it right. They either take off or land in one direction or the other. But how do they know which is the right direction?

Airport Diagrams

Every FAA-certified airport has an Airport Diagram created for it to aid pilots in navigating their way around. This becomes very important at very large, complex airports especially if the pilot/s has never been there before.

On these airport diagrams, all the taxiways and runways are drawn and numbered. These diagrams come in both paper and digital copies and with digital displays and iPads now commonplace in the cockpit the software will use GPS to even show the aircraft’s position on the digital diagram as it taxis around.

Runway Numbers are Shown at the End of the Black Strips

This fantastic technological development has really helped pilots from getting lost at large airports and ensuring they taxi to the correct runway for takeoff!

Signage

Airports all over the world have a standard format to the signs used to identify specific airport information. There are signs for runways, taxiways, and frequencies everywhere to help guide the pilots to the information they require.

Runway 19/01 Ahead

When a taxiway leads to a runway there will be a red & white sign next to the taxiway but just before it meets the runway to show the pilot which runway they are about to turn onto.

This is the last indication the pilot has to ensure they are about to enter the correct runway.

Compass Check

The very last chance a pilot has to ensure they are on the correct runway is when they line up to take off. Each runway is numbered to represent its magnetic heading, therefore if the pilot wants to take off on a runway facing north, they need to make sure their cockpit compass is pointing north.

By now the pilot could be in grave danger if they have taxied onto the wrong runway, but at a quiet airport, especially in low visibility, a quick compass check to confirm they are lined up on the runway they are supposed to be on will ensure no surprises on departure.


Join My Newsletter & Get Great Tips, Information and Experiences To Help You Become a Superb Pilot!

* indicates required
Your Interest: *

How Do Pilots Identifying The Right Runway From The Air?

You may be surprised by this but runways can be quite difficult to see from the air especially when you are approaching them perpendicular! To help pilots ensure they are about to land on the correct runway there are the following features used in the aviation world

Airport Information and ATC

When a pilot is inbound to an airport for landing one of the first things they will do is obtain the latest weather and airport information for that airport either from a digital communications link or via a dedicated radio frequency for that particular airport.

This pre-recorded information broadcast will tell the pilot what the current runway in use is, or for smaller airports just advises of the wind direction so that the pilot can begin to plan their approach for a particular runway. Then, upon initial radio contact with the airport the pilot will be advised again by the air traffic controller which runway is in use.

For small airports with no air traffic controller pilots will either talk to one another, or if there appears to be no other aircraft around the pilot will make ‘Blind’ radio calls informing any other pilots who might be just listening to their intentions about landing.

Approach Plate Review

For all airports that have instrument approach procedures, there will be an ‘Approach Plate’ issued by the FAA for that particular approach. This is a diagram and information that the pilots use to identify, navigate to and fly to ensure they land on the correct runway.

This approach plate is for a GPS Instrument Approach to Runway 14 at Wichita, Kansas.

Approach plates show all the applicable information, an aerial view the pilots can use to ensure lateral navigation as well as a side view to depict the vertical path the aircraft should be following.

This approach plate is just another step to ensure the pilot is planning to land on the correct runway. As you can see, the runway for this particular approach is clearly labeled and bolded twice on the plate.

Localizer Frequency

The most accurate type of instrument approach that an airport has is called an ILS or Instrument Landing System. This system uses two radio antennas to send out radio signals along the approach path to the runway.

The Glideslope Antenna creates a 3° funnel down to the runway, while the Localizer Antenna creates a lateral funnel to the runway centerline.

To ensure the pilot is heading toward the correct runway, the Localizer frequency will be different for each runway. The pilots will tune in their navigation radio to the correct localizer frequency and then the cockpit instruments will guide them down the correct funnel for the intended runway.

This correct selection of localizer frequency is very important especially when multiple parallel runways are in use at the airport and the pilots are flying in cloud and are unable to see the runway until the last minute.

Selecting the wrong localizer frequency could cause the pilots to fly an approach to a runway being used for aircraft taking off only!

Cleared for the Approach

Once a pilot has selected the runway on which they intend to land, and selected the approach for that runway, the second to last check to ensure they are going to land on the correct runway is listening to their air traffic controller.

The air traffic controller will clear the pilot for a specific approach to a specific runway. This ensures that the controller has informed the pilot twice of the correct runway to use before beginning the approach procedure.

As you can start to see there is a chain of events that are all designed to ensure the pilot/s have had multiple chances to make sure the aircraft and pilot’s brain are setup for the correct runway!

Runway Numbering

As mentioned in the previous section, runways are lined up with the magnetic heading that they face and for each runway it has two directions. Even though it is just one piece of tarmac it is referenced as two separate runways. For easy identification from the air each runway will have two very large, white numbers painted on each end.

These numbers represent the magnetic direction the rest of the runway faces, so for instance this runway faces easterly and will have a magnetic heading of 060°. Runways are numbers to the nearest 10 degrees and will miss the last zero.

This runway will have 06 painted on the approach end of it. At the far end of the same piece of tarmac, the number 24 will be painted to indicate it is the westbound runway.

When a pilot is on final approach, a quick check of the large numbers against the cockpit compass is their last chance to ensure they are lined up for landing on the correct runway. It begins to get a little more confusing when airports have multiple runways lined up parallel to one another.

If you look at the airport diagram above you will see that PDX – Portland International, OR has two parallel runways. To ensure the pilots land and depart using the correct runway they are numbered as 28R & 28L and the opposite ends are numbered 10L & 10R.

The letters:
L = Left Hand Runway
C = Center Runway
R = Right Hand Runway
guide the pilot to the runway designated to them by air traffic control. So, for instance, when ATC clears a pilot to land on 26 Left, the pilot must ensure their aircraft is heading 260° and aiming for the left hand runway.

To Finish

Over the many decades that aviation has grown, multiple accidents caused by pilots using the wrong runway have caused incredible fatality numbers. To overcome this the global community has designed many ways to give pilots runway information multiple times before they take off or land to ensure that no aircraft does not go where it is not supposed to.

To be honest, until I sat down and wrote this article I never realized just how many times the runway information was passed to me during a typical flight. It is just second nature, but the system works as I have never been unsure of which runway I’m to land on, it just becomes a little more difficult trying to find small runways in remote areas when you are approaching them from the side.

Large airliners are smoothly guided by air traffic control to be lined up with the current instrument approach in use, then the multiple safety nets used to ensure the correct runway will appear has taken many unfortunate accidents to develop, but now at least, there should be no excuse for a pilot to use the wrong runway.

Further Reading

If you found this article interesting and would like to keep reading, I highly recommend the following articles from my blog:

How Do Pilots See At Night? A Pilot Tells All!


Sitting in the back of an aircraft as it takes off at night leads to some beautiful illuminated scenery until the inky black night surrounds the aircraft in its cloak. So if the passengers see nothing out of the windows, how do the pilots see when flying at night?

For aircraft at high altitudes, air traffic controllers and radar become the pilot’s eyes at night. For low altitude flights; city lights, night vision goggles & landing lights help the pilots to see outside of their cockpit. Cockpit instrumentation is used to fly at all other times.

Flights are split up into two categories: IFR & VFR, and depending on which category the pilot is flying under, will dictate whether they need to see out of the aircraft windows or not. This might seem a little unnerving to many of you but it is a structured process that happens all over the world on a daily basis.

Let’s take a look at how pilots see at night and if they even need to see at all!

How Do Pilots See At Night Under IFR?

Firstly, IFR stands for Instrument Flight Rules and it means that pilots do not need to be able to see the ground or horizon to pilot an aircraft. They fly and navigate using cockpit instrumentation and guidance from air traffic control and their radar surveillance systems.

Most aircraft over 20 seats will always be flying under IFR rules and the pilots do not need to see outside, mainly because there will be nothing to see once they fly into the clouds or into the night.

This is how the entire airline world operates! As an aircraft takes off, the pilot/s use the aircraft landing lights and runway lighting system to guide them down the runway. Once airborne, the pilot/s call the departure controller and confirm they see the aircraft on their radar screen.

Runway Edge & Centerline Lights Help Guide Pilots At Takeoff & Landing

From that point on the pilot’s eyes will be inside the aircraft monitoring the instrumentation and managing the aircraft to fly the routing as required by the GPS or by following instructions from the air traffic controller.

It is now the air traffic controllers’ job to ensure aircraft remain clear from one another for the entire duration of the flight and because of this, pilots do not need to see out of the window, besides, at 35,000ft at night, there is nothing to see!

Once the aircraft starts its approach to land, the pilots will be looking for the airport’s approach lighting system that will help them identify and guide them to the start of the runway. These approach lighting systems are specially designed to stand out from surrounding city light pollution and help guide pilots down safely as they begin to reach the end of the instrument approach.

London City Airport’s Runway Is Easy To See When Lined Up For Landing!

Once the pilot has the runway in sight, powerful landing lights mounted on the aircraft will help to illuminate the runway to ensure it is clear and help with depth perception to allow for a smooth touchdown by the pilot.


Join My Newsletter & Get Great Tips, Information and Experiences To Help You Become a Superb Pilot!

* indicates required
Your Interest: *

How Do Pilots See At Night Under VFR?

VFR stands for Visual Flight Rules and as you may have guessed, it requires the pilot to fly with visual reference to the earth’s surface and/or horizon at all times. Because of this, pilots need to be able to see at night to safely pilot an aircraft and they will have very little help from air traffic control once away from the airport and outside its controlled airspace.

The most common types of aircraft that fly VFR at night are as follows:

  • Privately owned small aircraft
  • Tour flights
  • Law enforcement
  • MedEvac
  • Traffic & news aircraft
  • Training aircraft
  • Wildfire aircraft

With VFR flights having a lot more flexibility in where they can go and what they can do the responsibility to remain safe and see is solely on the pilot of each aircraft. Air traffic control’s primary concern is their IFR aircraft and once a pilot is away from their area of control, VFR pilots are free to go on their merry way and do as they please, providing they follow the FAA’s rules and regulations!

Once Outside Of The Magenta Sectors VFR Pilots Are On Their Own!

To help VFR pilots see at night there are several things, equipment, and systems available that can really improve pilot vision and increase safety:

  • Preparing the Pilots Vision
  • Aircraft Lighting
  • City Lights
  • Night Vision Goggles
  • Synthetic Vision Systems

Preparing Pilot Vision For Night Flights

Any pilot wishing to fly at night needs to prepare their vision to allow them to see with the most clarity. Just like walking out of a dark building into bright sunlight, our eyes need time to adjust from bright environments like offices and hangers to the dark sky.

I still remember doing this for my first ever night flight during my flight training. My instructor and I used our flashlights to give the aircraft a preflight inspection and get all the paperwork done, then we grabbed a coffee and went and sat out by the aircraft to drink our coffee and stare up at the stars.

It takes roughly 30 minutes for the human eye to fully acclimatize to darkness and the time it took to drink our coffee worked perfectly!

Once in the aircraft, pilots will adjust the cockpit lighting to the minimum intensity needed, they will use red lights in the cockpit as white light destroys night vision and the pilots will avoid, where possible, looking at the bright runway and airport lights when taxiing and taking off.


Taking off at night in a small aircraft is an incredible experience and you see so much more than through the small windows of an airliner!
I highly recommend everyone take a night flight in a small aircraft at some point in their life!


Aircraft Lights Required For Night Flights

To legally fly VFR at night the FAA mandates under 14CFR 91.205(c) that all aircraft be equipped with the following working lights:

  • Red or White Flashing Anti-Collision Light
  • Position Lights

The anti-collision light really helps find an aircraft flying around an illuminated city. By using their peripheral vision, pilots can look for this moving strobe light to help pinpoint other aircraft – It works really well!

The position lights are very helpful in identifying in which direction other aircraft are flying. Every aircraft’s position light layouts are the same:

Depending on the color/s of light a pilot sees, they can quickly ascertain if the other aircraft is coming towards them or is on a merging course. Once a pilot has worked out the direction of flight of the other aircraft they can maneuver their aircraft to maintain separation.

City Lights Help Pilots See At Night

The amount of light pollution that is given off by even the smallest towns and cities is phenomenal. For pilots flying around over a city is easy to fly an aircraft safely and navigate.

When flying over a city, pilots can easily discern which way is upright and by using the roads, unique buildings, and monuments, finding their way around is a breeze. However, pilots flying around a city usually means more aircraft in the same area, this is why knowing their own position at all times, keeping a good lookout for other aircraft lights, and maintaining good communication with air traffic control is a must to keeping everyone safe.

Flying around a city at night is just as easy as flying during the day. The big issue comes when pilots begin to fly out into the remote parts of the country where there are no lights on the ground.

Using Night Vision Goggles To Fly At Night

When flying in the darkest, remote parts of the country pilots have two options:

  1. Fly using their instruments only, or
  2. Use Night Vision Goggles

For the pilots who just cruise around the skies in their private planes and helicopters, night vision goggles (NVG’s) are just out of their reach in terms of price and acquisition, so they must fly with reference to their instruments.

Night vision goggles are exactly what they sound like. They are a pair of small binocular-type devices that fit on a pilot’s helmet. They take in the natural illumination of the night and amplify it to render a real-time image in each eyepiece so that the pilot can see no matter which way they move their head.

A Typical Pilot NVG Setup

For pilots flying professionally like law enforcement and medevac helicopters, NVG’s are a complete game changer! I have flown in remote parts of the country at night without them and you will see in the video below what a difference they make! – Try and spot the stranded hikers!

The latest generation of NVG’s now use white phosphor lenses instead of green, and have even greater incredible clarity and contrast to allow pilots to easily see at night!

Using Enhanced Vision To Fly At Night

Very similar to night vision goggles, except this vision system is permanently fitted into the aircraft itself and uses an infrared camera to peer into the blackness. The real-time image is displayed on pilot display screens or even into Heads-Up Displays (HUD).

Pioneered by Gulfstream Aerospace, they installed this system as standard on its G550 series aircraft since 2003 then later models, including the G450 & G650. This is a great system for airplanes that only need it looking forward toward the runway, whereas the NVG’s work better for pilots who need to look all around when landing.

This video below shows the comparison as a Gulfstream airplane lands in Aspen, CO:

To Finish

For pilots needing to see at night, it really depends on the kind of flight they are doing. For airlines, once the aircraft has raised its landing gear the need to see is not required again until the pilots are on final approach for landing.

For VFR pilots, the ability to see is needed, and by preparing their eyes and flying over well-lit areas any pilot can fly just fine. The problems come when the city lights disappear and the pilot is met with the ink-black sky.

Flying by sole reference to instruments or using an assisted vision system is the only way to safely pilot an aircraft, especially when coming into land.

I have hundreds of hours flying at night and it’s a great experience, but punching off into the darkness and flying by sole reference to instruments takes a while to build confidence in your own abilities and that of the aircraft!


If you feel like trying out a set of assisted vision binoculars for a very reasonable price, this set on Amazon.com is getting great reviews from over 700 buyers. At just over $100 they open up the nighttime world and are capturing great images and inspiring many people to take them everywhere!

Great for camping and hunting trips or even passing to the kids in the back of the car on those long road trips. I obviously cannot recommend these for flying, but for adding some fun to an evening under the stars they are going to go on my next birthday list too!

You can find them Here at Amazon.com


Further Reading

If you found this article interesting and would like to keep reading, I highly recommend the following articles from my blog:

Do Helicopters Have Autopilots? Some Do!


Flying for hours across the country in a helicopter can mean sitting in one position without being able to take hands and feet off the controls. By the end of the day, I practically flop out of the pilot seat! Oh, I wish my helicopter had a hands-off autopilot, and that leads to the question: “Are there any helicopters that have autopilots?”

Most large helicopters come equipped with automatic flight control systems to fly and navigate the aircraft automatically. Smaller, less complex automatic flight stabilization systems can be installed in smaller helicopters if space, weight, power, and budget allow.

A helicopter is a very complex aircraft to fly and because of the aerodynamics involved they are known as ‘Dynamically Unstable’. What this means is that when a pilot takes their hands off the cyclic (main control for pitch and roll), the helicopter will want to pitch and roll by itself, placing the helicopter into dangerous flight conditions.

To have an autopilot that can overcome this instability, fly the aircraft, monitor it, and navigate requires a very, very complex set of avionics, sensors, and flight control actuators. As you can imagine this is not cheap or lightweight!

Let’s take a look at all you need to know about helicopter autopilots…

Can Helicopters Have An Autopilot?

The systems required to allow an autopilot to be used in a helicopter are complex, take up quite a bit of room, and are very expensive. Because of this, helicopters of 4 seats or more are the only ones that usually qualify for having an autopilot system installed.

There are different levels of autopilot complexity and capability and the size of the helicopter and its primary usage will dictate what level of autopilot system will be installed when requested by the owner.

The Robinson R44 is about the smallest helicopter to have an Autopilot System
Source: Raymond Wambsgans

The most basic autopilot systems will give basic flight stabilization, hold a set altitude and heading and provide the pilot visual routing and approach guidance on a primary flight display (PFD) in the cockpit if coupled to a suitable GPS.

A great example of this is the Genesys Aerosystems HeliSAS Autopilot system fitted in the Robinson R44 & R66 helicopters. With an Aspen 1000H Primary Flight Display, this system can be installed for around $60,000.

When helicopters require more features and capability from an autopilot system they become integrated into very complex, whole-helicopter avionic systems that are very expensive, but they allow helicopters to be flown very precisely with very little pilot interaction.

These kinds of systems you will find in the majority of twin-engine helicopters like the Airbus H135 all the way up to the Sikorsky S92.

Collins Aerospace Integrated Avionics on a Sikorsky S92 – Source: Ahmed Hader

Although an autopilot system would be welcomed by many pilots, no matter the size of the helicopter, they are really only suited to helicopters that are large enough, powerful enough, and have digital avionics systems.

When Are Helicopter Autopilots Used?

Helicopter autopilot systems really shine when the flight path of the helicopter can be taken care of to allow the pilot/s to concentrate on other tasks like:

  • Flying IFR in the clouds or at night
  • Long-distance flights to alleviate pilot fatigue
  • Provide smoother, accurate flight paths
  • Allow pilots to alter navigation or communication settings
  • Allow for stabilized departure and approach profiles in poor weather
  • Maintain accurate route tracking for increased time and fuel management
  • Maintain accurate positioning when flying in very busy airspace

Flying long distances, IFR, and at night are the main uses for using an autopilot on a helicopter. By allowing the helicopter to do the flying, it allows the pilot more mental capacity to monitor the flight and prepare and configure the helicopter for the next phase of the flight.

I loved The Autopilot System In The Leonardo AW139! – This Is In The Simulator 😉

To give you some idea of what a complex helicopter autopilot system can do here is an example:

The pilot can lift the helicopter into a hover and begin to take off down a runway. At around 40-60kts (model dependent), the pilot can press a button and the helicopter autopilot system will take over. It will then automatically climb up to the requested altitude that was set by the pilot, it will accelerate to the requested speed, set by the pilot, and fly a complete routing as programmed into the GPS by the pilot only with a couple of button pushes!

When the pilot is ready for the approach and landing, they will input the instrument approach procedure into the navigation system, the autopilot will pick up the instrument approach, turn the helicopter onto it and begin the approach down to the runway.

With another click of a button, the helicopter will begin to automatically level off at 150ft above the ground and slow down so it flies at 60kts & 50ft over the runway. With another button press, it will automatically come into a hover and by pressing the thumbstick on the collective control the helicopter will land. No pilot control is needed on the controls!

Pretty impressive stuff!!

Offshore Helicopters Are All Fitted With Autopilot Systems

Many years ago I heard a rumor that some pilots flying out to the offshore oil and gas platforms in the North Sea were having an unofficial competition to see who could do a specific trip with the least amount of time with hands on the controls.


From wheels up to wheels down the record was something around the 20-30 second mark for the entire flight!


Are There Different Types Of Autopilot Systems?

There are three basic forms of autopilot systems that can be installed in a helicopter:

  1. SAS – Stability Augmentation System
  2. ATT – Attitude Retention System
  3. CPL – Coupled System

SAS

The SAS type of system is the most basic. In its simplest form, SAS is a stabilization-only system. The pilot is still required to hand fly the helicopter but the system will help to smooth out the pilot or weather-induced oscillations.

The SAS system uses basic sensors and electronic processing to monitor the aircraft’s attitude and the speed at which the attitude changes. It then sends electrical signals to actuators (integrated electric motor & gears) to move the flight controls to help dampen and smooth out the flight path.

SAS will not provide any auto-flight capability or visual navigation guidance to the pilot.

This type of system will be fitted to the smallest helicopters, usually consisting of 4 seats or more, and controls the pitch and roll axis.


Join My Newsletter & Get Great Tips, Information and Experiences To Help You Become a Superb Pilot!

* indicates required
Your Interest: *

ATT

Attitude Retention is a system that keeps the helicopter in its current flight state when activated. It also controls the pitch and roll axis of the helicopter.

If it is activated in straight and level flight it will keep the aircraft there. If it is activated during a 10° right-hand turn it will keep the helicopter in a 10° right-hand turn. If wind or turbulence try and move the helicopter away from the set flight regime it will move the helicopter back to it.

This is a hands-off type of flight control system but it also allows for simple overriding control by the pilot. Pilots can change the current flight condition by either:

  • Pushing against the flight controls to set a new regime then letting go and the helicopter will return to its current state of flight albeit on a new heading or altitude, or
  • Moving a ‘Trim’ button on the cyclic to set a new heading or pitch attitude, or
  • The pilot can press a button on the cyclic which deactivates the ‘Force Trim’ holding system, adjust the aircraft s flight attitude, then release the Force Trim button to now set the new flight regime for the ATT system to maintain

This type of system was the earliest form of a helicopter autopilot. It allows for hands-off flying but has no auto navigation display guidance or flight control commanding. More complex autopilot systems use this ATT system as their foundation on which to build the fully coupled auto flight systems.

Even This Sikorsky S76A had basic ATT & CPL Autopilot Systems.

CPL

This is the system that many people think about when they hear ‘Autopilot’. It is the most advanced autopilot system and contains many parts to allow fully autonomous flight once configured and activated.

A Coupled autopilot system will take in information from many sensors and provide visual navigation guidance to the pilots who can either fly the aircraft manually following the visual guidance cues on instruments or digital fight displays or when activated, the autopilot system will autonomously fly the aircraft ‘coupled’ to the same navigation guidance.

A coupled system comprises of two main parts:

  • Autopilots – Provides the aircraft stability (mentioned above)
  • Flight Director – Provides navigation guidance

Within the Flight Director are many systems that allow for fully automatic flight:

  • Sensors
  • Pilot Selection & Activation Controls
  • Central Processing Unit/s
  • Flight Control Actuation

These systems work together and are commonly referred to as the AFCS – Automatic Flight Control System. In the next section, I will try and describe how one of these complex systems works to provide fully automated flight.

How Do Helicopter Autopilots Work?

When you are requiring a helicopter to have a fully coupled autopilot system you are going to need deep pockets as the systems I am about to go through are not cheap, especially when it comes to aviation! I swear manufacturers add on an extra zero the second it mentions anything aviation related!

For a full AFCS auto flight system to work seamlessly it will need the following:

Sensors

Sensors are placed all over the aircraft to gather information and send it to the central AFCS electronic processing unit/s. These sensors are used to monitor things like airspeed, altitude, GPS position, flight control positions, electric actuator positions, rate of climb, bank angle, and hundreds of other parameters.

These sensors give the central processing unit its data to know where the aircraft is and what everything onboard it is doing. These are like the senses we all have – sight, smell, taste, hearing, balance, touch etc.

Without this information, the AFCS would not know where the aircraft is to do be able to do anything with it.

Pilot Commands

The AFCS will do nothing unless it is activated and told what to do by the pilot/s. The way this is done is by having a series of buttons and numerical selector knobs in the cockpit.

Guidance Control Panel On AW139 Helicopters

These Guidance Controls Panels allow the pilots to activate the auto flight system called the Flight Director when required and to also tell it which flight parameters the pilots wish to be automatically controlled.

The most common flight parameters used by the pilots are:

HDG – Heading: When pressed, this is used to fly the helicopter on a set heading. Mainly used when receiving vectors from air traffic control. The pilot selects the required heading via a selector knob and the helicopter will do a Standard Rate Turn (3° Per Second) and roll out on the requested heading.

NAV – Navigation: This is pressed when the pilot wants the aircraft to automatically fly the planned routing via GPS waypoints, navigation beacons or published airport departure procedures. The routing is entered using an MCDU – Multifunction Control Display Unit.

ALTA – Altitude Aquire: When pressed, this is used to climb or descend the helicopter to a set altitude. The system will set the helicopter in a climb for instance and automatically level off to the altitude set using a numerical selector knob.

ALT – Altitude Hold: When pressed, this is used to maintain the current altitude of the aircraft. Once ‘ALTA’ has captured and leveled off it will switch to ALT mode. This is mainly used when in cruise and different altimeter settings are received from ATC or weather reports. The helicopter will auto-adjust its height to maintain the pilot selected barometric altitude.

APP – Approach Mode: When flying into an airport using a published instrument approach procedure the pilot can select APP mode to allow the helicopter to acquire the approach flight path and automatically fly the helicopter down to the runway via the published routing.

IAS – Indicated Airspeed Mode: When pressed, this will accelerate or decelerate the helicopter to the required airspeed set by the pilots. This is done using a selector knob/button to set the target speed and when the value is changed, the helicopter will automatically alter the speed to meet the desired setpoint

There are many other functions, but for this article, the pilot will generally want the aircraft to fly under NAV, ALT & IAS. Then when flying around an airport ALTA, NAV, APP & HDG are commonly used.

FMS – Flight Management System

The Flight management system is exactly what it sounds like. It manages the flight parameters requested by the pilots and is part of the Central Electronic Processing Unit.

Within the FMS there are usually two independent autopilot systems to act as redundancy. The first one activated will become the master, and the second one will be the slave. They work together as a pair but if one autopilot fails, the other will automatically take over to 100%.

One of the primary parts of the FMS is the MCDU – Multifunction Control Display Unit.

This unit is where the pilots can input and select all the required navigation routing waypoints, published departure, and approach procedures stored in its database. The selected routings will be engaged and flown when the ‘NAV’ button is engaged on the Guidance Controller and the aircraft reaches each point on that journey.

There are usually two of these in the cockpit, one for each pilot although they are synced so any changes made on one show on the other.

Central Electronic Processing Unit

This is the brain of the automatic flight system. It takes in all the data from the sensors, FMS & cockpit buttons and processes it using complex software code and algorithms to issue digital commands to the pilots’ flight displays and electric actuators that move the flight controls.

As the commands are issued to the electric actuators it constantly monitors the data coming back from the sensors to ensure the aircraft is doing what it has told it to do and it automatically makes any changes required.

Just like most things in a complex helicopter, there are two of them that work together as a pair but if one fails the other automatically takes over to ensure control is not lost.

On the Leonardo AW139 these central electronic Processing units are called MAU1 & MAU2 (Modular Avionics Units) and are mounted in the nose of the helicopter. They are working on their own, monitoring the other to ensure the operation and syncing data between one another to ensure a seamless transition if one fails.

Electrical Actuators

The electrical actuators do the physical moving of the flight controls that the auto flight system requests. They turn the digital signals sent from the Central Processing Unit to operate motors and gears, called actuators, to move a shaft up and down or rotate it back and forth.

Most actuators used on a helicopter are linear and ‘Dual Type’ meaning that there are two actuators joined together in one unit and each independent autopilot system controls one part of the actuator at 50%. If a failure occurs in one of the autopilots, the second autopilot will begin moving the actuator at 100% to account for the other failed system.

Flight Control Linear Actuator On Aw139

Above, you can see that the pilot can move the Main Rotor Servo control rods via the Cyclic, and the Dual Linear Actuators can also move the main control rods via the connecting bellcranks.

This allows either the pilot or the automatic flight control system (AFCS) to control the helicopter, but it also means the pilot can override the automatic system at any time just by grabbing the controls.

The automatic flight control system works by having a Dual Linear Actuator connected to every control rod that goes to a flight control hydraulic servo on the AW139:

  • One for Pitch
  • One for Roll
  • One for Yaw

By issuing commands to the dual linear actuators, the helicopter can be controlled on each axis. This is a 4 axis AFCS system. The fourth axis is height. This is when the Collective control is raised and lowered by the pilot or AFCS, both the Pitch and Roll actuators operate to command the hydraulic flight control servos to raise/lower the swashplate ‘collectively’.

AW139 Actuator Locations

Flight Control Servos

These are the muscles of the helicopter! Hydraulic servos are what connect to the swashplate and slider of the main and tail rotors to change the pitch of the rotor blades.

This is like the power steering of your car. Larger helicopters require huge amounts of force to overcome the aerodynamic loads placed on the rotor blades and the only way to control the helicopter is to use hydraulic servos.


The Sikorsky S92 has a dual hydraulics system pressurized to 4000 psi / 275 bar!


The push/pull flight control tubes that are linked to the pilot’s Cyclic, Collective & Pedals move pilot valves in the hydraulic system that tell the high-pressure hydraulic servos how to move.

Hydraulic Servos On AS350 Astar Helicopter

Most helicopters have 3 hydraulic servos to move the main rotor swashplate and the larger helicopters usually have 6 – each servo doubled up for redundancy running off two separate hydraulic pressure systems.

The AFCS system is connected in line with the push/pull tubes to move the pilot valves in the hydraulic servos. No matter if it’s the pilot or the AFCS actuators moving the push-pull/tube, the hydraulic servo knows no different. Whenever the control tube moves the pilot valve, the hydraulic servo moves and alters the pitch of the rotor blades.

This is how the AFCS is able to control the helicopter to guide it when coupled to the Flight Director.

To Finish

Helicopters can be fitted with autopilot systems providing there is enough spare weight, space, and budget to install a system. There are many types of autopilot systems on the market and having an autopilot in the helicopter really can reduce the pilots’ workload to allow much safer flight, especially when flying IFR and at night, even more so if it is a single-pilot operation.

Having flown helicopters with AFCS and ones without, they both have their pros and cons, but I know that when I fly long-distance flights or the weather is getting worse, the option to activate the autopilot systems would be very welcomed!

Further Reading

If you found this article interesting and would like to keep reading, I highly recommend the following articles from my blog: