Are You Wanting To Become a Pilot?
Find Out How to Save Hundreds to Thousands of Dollars When it Comes to Your Flight Training!

Recent Posts

Can Pilots Use iPads?


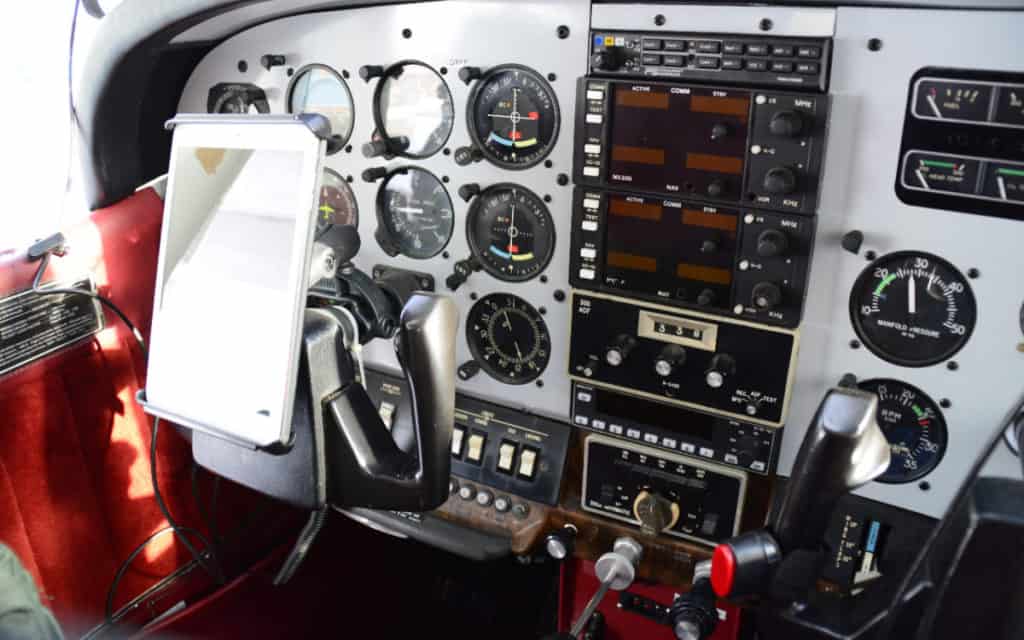
Many a time I have been walking onto a plane and seen an iPad stuck to the pilot’s side window or mounted just to the side of the main instrument panel, but what do they use them for? Surely they don’t watch movies when in cruise flight!

iPads allow the pilot’s paperwork, aeronautical charts, and company memo’s to be stored digitally, thus saving the space needed to be carried in the cockpit. Additional apps for weight & balance, weather, flight planning, scheduling, and navigation make the iPad a very compact and powerful tool.

Over the last 10 years, the addition of apps for the iPad has created an incredibly handy tool for any pilot to have in their cockpit. As they have proven to be very reliable companies can apply to have electronic flight bags instead of carrying around a huge case of charts, paperwork, manuals, and the like.

What iPad Apps Do Pilots Use?

At the company I fly for we have just been approved for the use of the iPad for storing and distributing our company memos, manuals, policies, and charts on an iPad and it is fantastic. iPads are a great tool to have in the cockpit as it allows a pilot to have everything at their fingertips, even away from the aircraft.

Most pilots will have the following apps on their iPads:

  1. A PDF reader for accessing the company documentation
  2. A calendar to be able to see their scheduled flights & customer information, if required
  3. Weather apps for forecast and actual aviation weather conditions
  4. Aircraft weight & balance calculation tools
  5. Flight planning tools
  6. NOTAM’s – Notices To Airmen. Allow pilots to check for any out-of-service navigation aids, airport runway/taxiway closures, airspace restrictions, etc
  7. Tracking flight duty – pilots can only work for so many hours and days at a time before needing mandatory rest
  8. Navigation charts, manuals, and procedures
  9. GPS navigation software
  10. Traffic & terrain avoidance software

This list is just the tip of the iceberg as you can imagine how many apps there are and every pilot likes to set up their iPad differently but the main thing to note here is that the iPad allows for a huge amount of tools and paperwork to be contained in something the size of a book instead of trying to find room for a huge briefcase full of stuff!

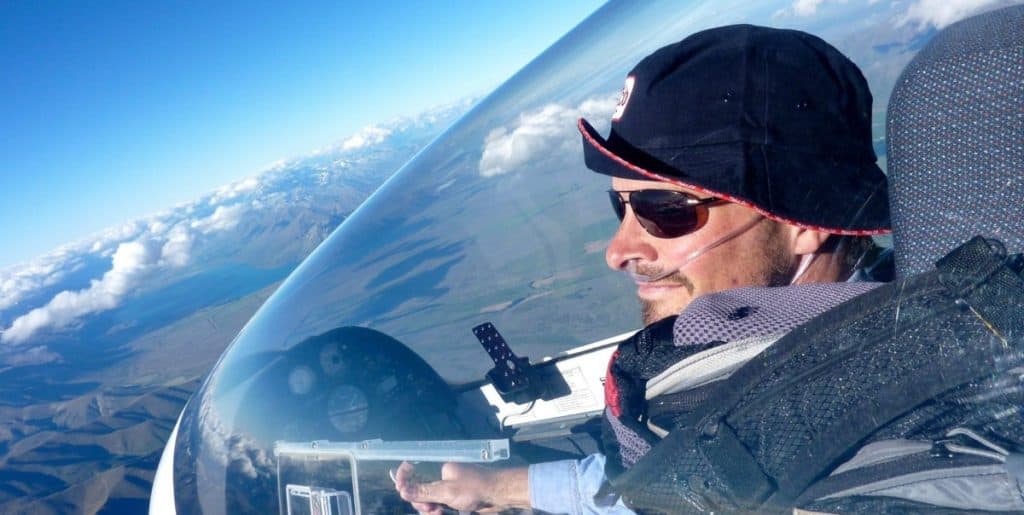
I was a little skeptical about having an iPad in the cockpit, especially in a small aircraft cockpit but having used the most popular size, the iPad mini for several years I can tell you that they are a fantastic addition to a pilots toolkit and they really do help make the planning and navigation of the flight so much easier. However, they do come with a few drawbacks!

Do Pilots Have Any Problems Using iPads?

For pilots using iPads in the cockpit of a commercial or corporate jet, there really are not many issues, however, for the pilots like myself who fly in the utility sector and are flying in remote areas, in all weathers, there are a few things that I have found over the years that have made me curse the iPad:

Software Not Working

We have all gone to use an app and you press on its icon and it starts to update. This is a pain when you are away from an internet source as the update process begins and then stalls because it has no connection. This is always when you seem to want to use that software too!

At the start of each day, I always open my iPad and update any apps before I go flying to prevent this!

Too Hot/Cold

Tablets sitting inside a parked aircraft in the middle of summer with the sun shining on them soon overheat and shut themselves down. Not good if you then want to go flying and need the information that is stored on the iPad. The same goes for when it’s really cold.

When I am out flying at -30°F I have to remove the iPad and insert it inside my clothes to keep it warm enough while I’m parked or it will also shut down. I don’t have this problem when using paper charts!

Flat Battery

A flat battery on an iPad makes it as much use as a chocolate teapot! I swear when you plug it in to charge in the hanger it’s ready in 2 minutes, yet you plug it into the aircraft and it seems to take 20! Always ensure your iPad has some charge in it before plugging it into your aircraft.

This is why it is also sensible to have paper charts available in the cockpit that are also folded to your area of flight!


Join My Newsletter & Get Great Tips, Information and Experiences To Help You Become a Superb Pilot!

* indicates required
Your Interest: *

How Do Pilots Secure An iPad?

Using an iPad is great but it also needs to function easily to prevent distraction while flying. To achieve this the iPad needs to be securely mounted in a location that does not block the view of outside or instrumentation, is easy to reach, and does not get affected by sun glare.

There are many ways to mount an iPad in an aircraft and finding the right option for your aircraft is easy using one of the following methods:

Suction Cup

By far one of the most popular and easy-to-install methods. A suction cup mount allows the iPad to be secured to a window or smooth, flat surface. This can be temporary or installed in the same spot every flight. Just be sure to lick your finger and wipe the suction ring with saliva to help it stick.

Be aware of where an iPad can fall to when using a suction cup as I have had them pop off the window, especially when flying at cold ambient temperatures!
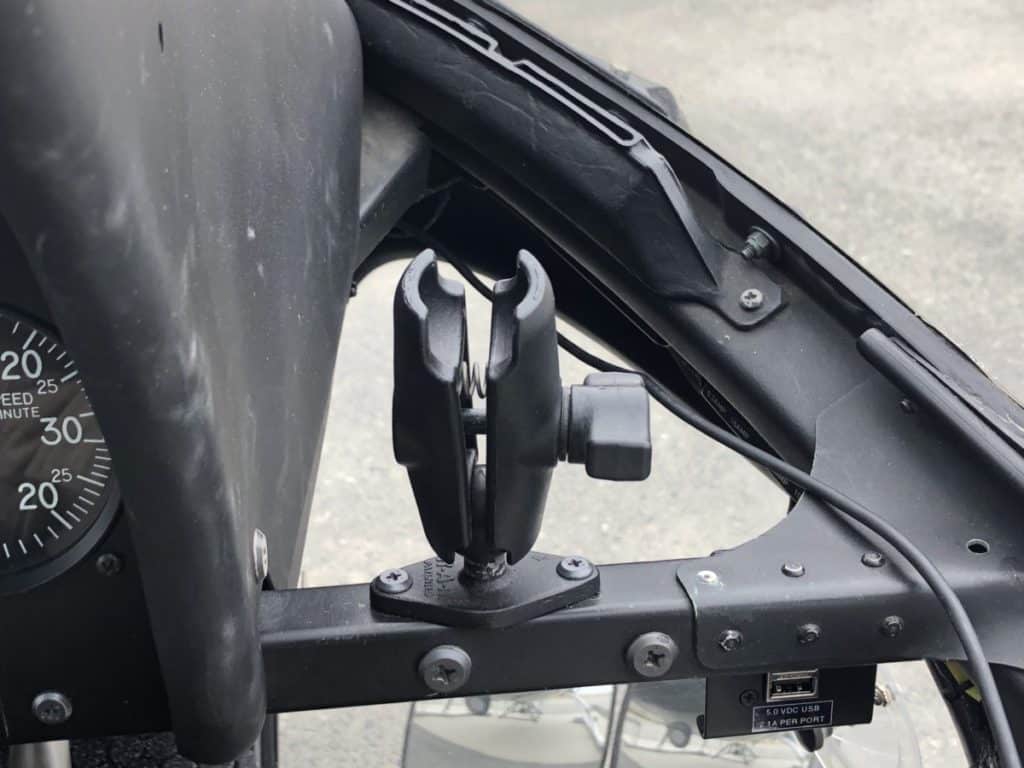
Clamp Mount

Clamp mounts allow an iPad to clamp to a tubular frame on the aircraft or the Yoke. This allows for a simple connection that puts the iPad in a convenient location.

Just be careful if you have the iPad installed on the yoke as it can require your head to be bowed down to read the information, rather than just glancing if it were mounted higher. Rapid head movements during IFR flight can cause sensory illusions.
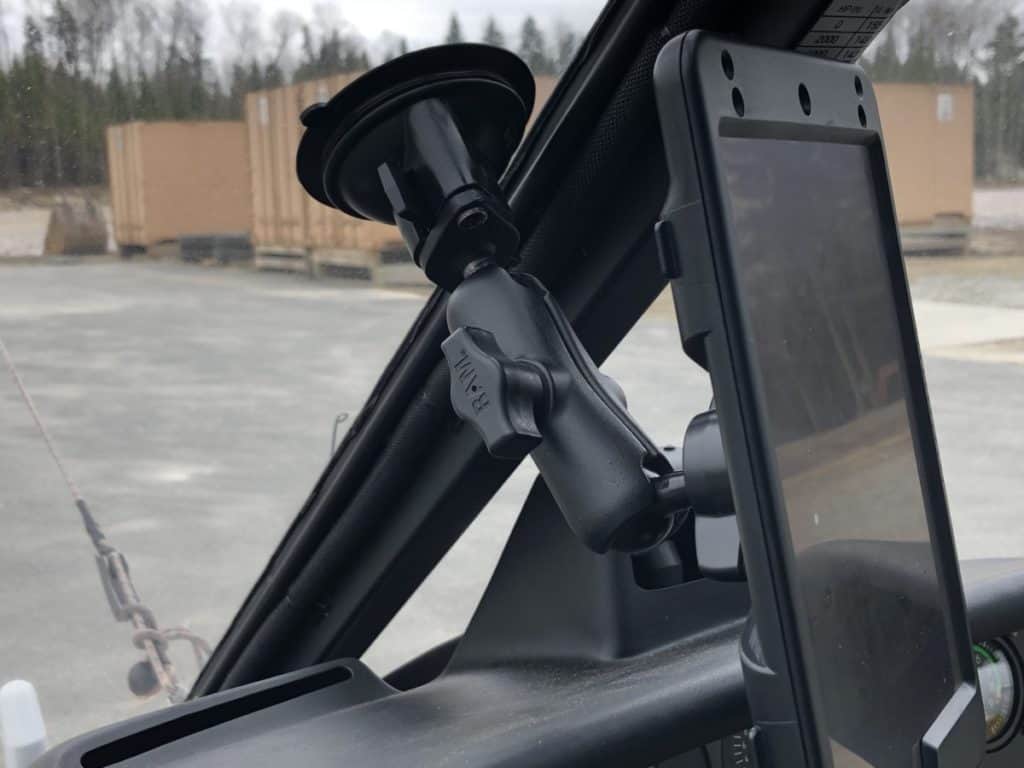
Ball Mount

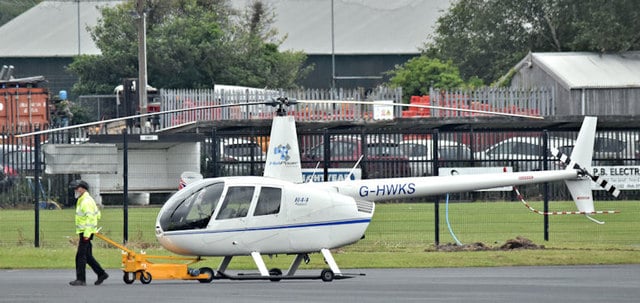
Using the Ram Mount system is a great way to permanently install a mounting location in an aircraft for the iPad. Our helicopter fleet has a ball mount installed in every aircraft with an extending bracket.

This allows me to attach the iPad, adjust, then tighten in seconds. A great option if you have a location to permanently secure it in your aircraft.

Kneeboard

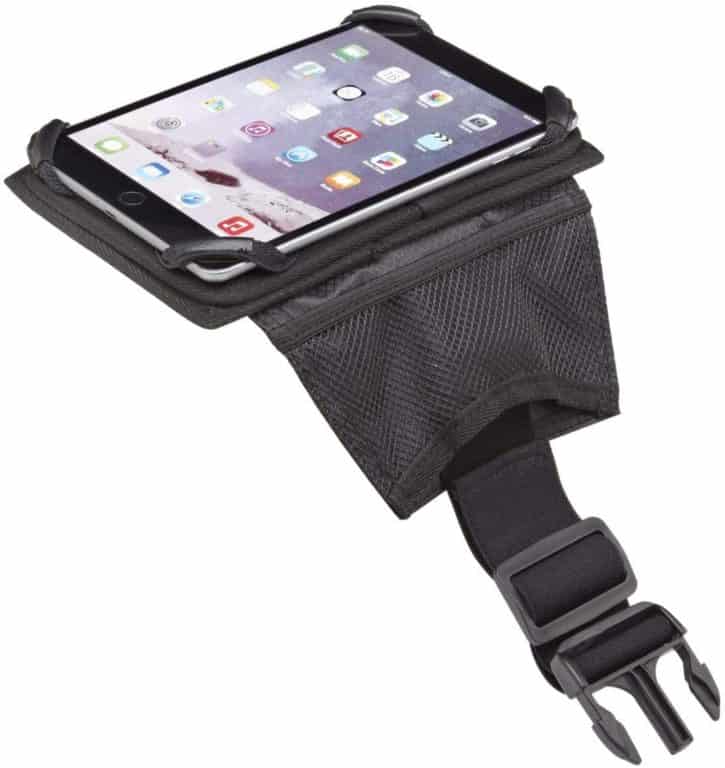
When space in the cockpit is at a premium or you have no location to install an iPad mount then a kneeboard secured to your thigh is a great place to secure your iPad.

I have used this method when a previous employer was testing out the iPads in the cockpit and it worked great. For helicopter pilots, we had to wear it on our left thigh as our right arm would cover it when holding the cyclic and you really had to have your head down a lot when using it, which I didn’t particularly like, but its works.

iPad Setup for Pilots – My Recommendations

The iPad is a great tool for any pilot (once they have finished training ;)) but that tool needs to be used correctly for it to perform at its best. To do that there are a few things I wish to recommend from my experience using one in the cockpit that will allow you to get the maximum benefit for the money you spend:

iPad Mini

For the cockpit, my size recommendation is the iPad Mini. It’s small enough to fit neatly into most cockpits but large enough to provide a good screen area to see all the data. I have tried to use a full-size iPad and it’s just way too big and cumbersome. The mini is a perfect size and the one used by most pilots.

You can find the iPad Mini Here at Amazon.com

Case

For the past 6 months, our company has been using a case and mounting system from PIVOT. The system includes a hard plastic case that encapsulates the iPad and then has a hard rubber cover that doubles as the stand when the iPad is out of the cockpit.

When it’s time to place the iPad in the cockpit, the cover is removed and the mounting bracket clicks into the same mounting location the cover just came from. It’s a great system, affordable, and has kept our fleet iPads in great condition. Moving from one aircraft to another is also a breeze. I highly recommend them!

You can find out more information on the complete PIVOT lineup at FlyBoys.com
Get 10% off your purchase by using the coupon code PilotTeacher at checkout!

Screen Protector/Glare Cover

When moving your iPad from the hanger to the aircraft and mounting and removing it’s important to help protect your investment. In our company, we do this with the aid of a simple screen protector which also doubles as an Anti-glare shield.

In certain light conditions, the sun can prevent you from seeing the information on the screen which makes this tool useless. This simple screen protector is a very cheap way to help protect your iPad from not only your heavy hands but the bright sun.

You can find the Tech Armor Screen Protectors I Recommend Here at Amazon.com

Ram Mounts

Being able to safely and easily mount your iPad is paramount in your cockpit. By far the best way to do this is by using the dozens of mounting options from Ram Mounts. I have used the Ram Mounts for years and in my opinion, they are one of the best-made, easy-to-use systems for mounting any device, not just in a cockpit.

With their products coming in individual components you can easily build a mounting system for very little cost to suit your aircraft perfectly.

You can find the Ram Mounts range Here at Amazon.com

To Finish

The use of an iPad in the cockpit is to help the pilot improve on efficiency, situational awareness, paperwork and helps to reduce the space required to carry all the paper versions of the documentation needed for each flight. By using this tool it can greatly reduce the pilot workload and stress which helps to improve flight safety.

Like any tool, it has its limitations and needs to be used correctly for it to maintain its place in the cockpit. Having flown with one for many, many years they are a great asset to any pilot.

Further Reading

If you found this article helpful, you may also the like the following:

Flying Into The Sun – How Do Pilots Deal With It?


We have all been driving in a car in the early evening as the sun is setting and the glare it creates is sometimes painful and also be very dangerous. Flying into the sun must also pose the same problems, so how do pilots cope with it when the sun is blazing through the windows?

Pilots try to block direct sunlight into the cockpit using good quality sunglasses, aircraft-mounted sun visors, shades, ball caps, and even Post-it notes and checklists stuck to the windscreen. When landing or taking off into the sun the pilot has to bear the pain as the runway needs to be seen.

The worst times for pilots are flying on an easterly heading as the sun rises or on a westerly heading as the sun is setting. During these times the sun is low to the horizon making the bright light straight into the cockpit which at the very least can be a painful nuisance or end in tragedy!

There are many ways many pilots try to block out the sun no matter if they are flying in a helicopter like myself, or a Boeing 747!

How Do Pilots Deal With Direct Sunlight?

At times pilots will be flying directly into the sun and I can tell you it is painful if you can’t get that damn thing hidden or the glare reduced. Not only is it dangerous by preventing the pilot from being able to see, but it can also be a distraction and can cause the skin to burn. My forearms and face always get a healthy redness when flying around in summer!

Some aircraft are equipped with cockpit windows that help to reduce glare and reduce the sun’s harmful UV rays, but in a helicopter, all I have is clear plexiglass windows that I swear seem to make the sun worse. I have been in some very crowded airspace with other aircraft I never knew were there because I could not see them and it’s a sickening feeling when you finally see them and it makes you jump!

For most commercial airplanes they are flying under the supervision of air traffic control with aircraft separation being maintained by ATC, so the collision risk is practically zero, it just becomes more of a hassle for those pilots.

For the rest of us mere mortals flying closer to the ground with our own MK I eyeball to keep us safe there are a few tricks that we all use to help us see:

Good Quality Sunglasses

No matter what aircraft a pilot is flying, a pair of high-quality sunglasses is essential to keep the eyes safe and healthy. Because of the sun’s UV rays, for every 1000ft of altitude gained, the amount of UV radiation increases by 5%. For pilots flying up in the higher levels of the atmosphere, the amount of UV radiation entering their eyes can be significant and damage can soon be done.

This is even without the sun shining directly into the cockpit!

The added benefits of a good pair of sunglasses are that they can come with lens coatings to help reduce glare, they can have coatings that automatically darken to match the light intensity and while doing this they help to keep the iris as small as possible to prevent too much light entering the pilot’s eye.

Without sunglasses, fatigue in the eye increases, blinking increases, and soreness can occur. I flew into the sun once on a bright snow-covered day without my sunglasses and the following day my eyes felt like they had sand in them. I know I did some short-term damage as my eye could hardly open during the flight as the brightness of the environment was so bright!


To find out more information on exactly why all pilots should wear sunglasses check out this article:

Do All Pilots Need Sunglasses? : Yes, Find Out Why!


Aircraft Mounted Sun Visors

Most commercial airplanes and even smaller aircraft like Cessnas come with or have the option to be fitted with sun visors for the pilots. The most common type of aircraft-mounted sun visors are darkened plexiglass screens that can swivel down and into position just like in your car. This allows each pilot to adjust the visor to their particular liking.

Side & Ceiling Mounted Sun Visors – Source: Super Jet International

For side windows, a semi-opaque roller screen is sometimes used to help block the sun glare when in cruise and under the supervision of air traffic control as they can block the view to a fair degree. Aircraft-mounted sun visors and a pair of sunglasses can really help to reduce the ambient light and the direct glare of the sun and are a welcomed addition to pilots on long flights with the sun beating directly into the cockpit.

I would love aircraft-mounted sun visors in my helicopter, I can tell you!


Join My Newsletter & Get Great Tips, Information and Experiences To Help You Become a Superb Pilot!

* indicates required
Your Interest: *

This leads me to my next few tips that the rest of us pilots flying in the basic aircraft are left with:

Hand, Fingers, or Thumb

The good old hand in front of the sun is a tried and true method and always works, but it has a few downsides:

  • Your arm gets tired! After 10 minutes I swear my hand can feel like it weighs 20 lb!
  • It blocks the sun great, but it also blocks the view, and trying to see another aircraft behind your hand is impossible!
  • If you need your hands to manipulate the controls, change radio frequencies, adjust the charts or GPS then you are hooped

Depending on how much sun glare is affecting the pilot, just a simple thumb held up maybe suffice, or even placing your fingers on the frame of the window to rest your hand while blocking that stupid sun can work well. Whichever way the pilot picks, if the flight is going to be a long duration they need to find another method!

Post-it Notes

Although this might sound silly, a Post-it note stuck to the window makes a great little sunshade! This is a technique I was shown over a decade ago by an ‘Old Salt’ pilot and I’ve used it ever since! I make sure to always keep a Post-it note in my notebook and when the sun is bugging me, I bring it out and stick it on the window where the sun is.

I love using it as it’s easy to move around and doesn’t block my view of the sky. It’s nowhere near as good as a full sun visor, but in a pinch, it works great!

Flying Technique

If all of the ways listed above are not available or do not work for whatever reason then there are two options that a pilot can do with the aircraft :

Fly Out of Trim – This means putting in some right or left pedal to ‘Side Slip’ the aircraft through the air. It’s not the most fuel-efficient or comfortable way to fly but if the sun is close to a door post or window frame, putting in a little pedal can yaw the aircraft enough to block the sun behind the frame or post.

This technique is great if you wish to get a few minutes’ rest from the biting sun and works really well if flying by yourself as any passengers may get an odd feeling of falling out of the side of the aircraft, but if you need a break, it works great.

Heading Change – If the sun is just setting or rising and it’s directly in your eyes, another technique is to change the aircraft heading. Instead of flying directly from point A to B, a pilot can use a zig-zag pattern instead. Think of it like a game of golf, instead of walking straight down the fairway, the golfer is walking from one side of the fairway to the other as they get closer to the hole – this is how I seem to golf anyways!

By changing the heading the pilot may be able to hide the sun behind a window or doorpost for just enough time for the sun to rise or fall enough to prevent its being a distraction. 5 minutes flying on each heading is a great technique to use.

Not the most fuel-efficient way to fly but in a pinch, again, can be used to provide some respite from the sun.

To Finish

Dealing with the sun is something that all pilots will face from time to time and it can be very distracting. Having a good quality pair of sunglasses is by far the first line of defense but then adding some form of sun visor or sunshade can really help to reduce glare.

Being able to see other aircraft is very important, especially for those of us not under the supervision of air traffic control, using the techniques listed above can really help to maintain a good visual scan out of the windows and allow everyone to stay safe.

Further Reading

If you found this article helpful may I suggest these too:

How Do Helicopters Get Moved Around On The Ground?


You may have seen helicopters sitting out on the apron or helipad and thought nothing of it, but then when you see a helicopter sitting in a hanger the thought may have come up as to how they get the helicopter from the hanger to outside so it can take off? Depending on the type of helicopter, moving it around on the ground can be fairly simple or take a little bit more work.

Helicopters without wheels can only move on the ground by use of a dolly, tow-cart, or ground-handling wheels. Helicopters with wheels can be towed using a tow vehicle and towbar and can move by using the thrust produced by its main rotor when running. Helicopters without wheels need to hover taxi.

Having flown both types of helicopters – ones with wheels and ones without I can give you some insider knowledge on how helicopters move around when on the ground. Helicopters that don’t have wheels have landing gear known as ‘Skids’. The helicopters with skids provide the most problems to personnel trying to move them around while they are on the ground.

How Do You Move a Helicopter Out of a Hanger?

For helicopters that have wheels, moving a helicopter in and out of the hanger or around the apron is a simple task. You connect a tractor, tug, or tow vehicle to the aircraft using a tow bar, release its brakes and pull/push it wherever you wish. Pretty simple.

For helicopters with skids, there are three main ways to move a helicopter:

  1. Tow-Cart
  2. Dolly
  3. Ground Handling Wheels

Moving a Helicopter Using a Tow-Cart

Tow-Carts are an electric/hydraulic device that attaches to the helicopter skids, picks it up, and allows the helicopter to be driven around. These are great devices that allow even large helicopters to be moved just by a single person. They come in a range of sizes to suit all helicopters.

Moving a Helicopter Using a Dolly

A helicopter dolly is a large platform mounted on wheels. The helicopter pilot lands the helicopter on the dolly and then it can be moved around using a tow vehicle, or some really fancy dollies are on rails that can move the entire machine in and out of a hanger with just the press of a button!

Dollies are a great way to allow a helicopter to be moved by just a single person but if they are small they can be dangerous to land on for a novice pilot, especially in high winds. Catching a skid on the edge of the dolly leads to Dynamic Rollover with catastrophic results!

In this case, the helicopter was doing maintenance runs, and the dolly was not chocked to prevent it from rolling. It starts to roll and the pilot panics and pulls the helicopter into the air but not high enough. They catch a skid and that’s the beginning of the end for that helicopter! The report from the police department says it was caused by a sudden gust of wind, but in my opinion, that sounds like BS. Someone screwed up by not choking the dolly!

Moving a Helicopter Using Ground Handling Wheels

Every helicopter comes from the factory with a set of ground-handling wheels. These are wheels that temporarily attach to the skids and then use either a hydraulic mechanism to lift each skid up off the ground or in smaller helicopters, a cam mechanism.

Source: Albert Bridge

Small helicopters like a Robinson R22 or Gumibal Cabri can easily be moved by a single person but once you get into helicopters larger than two seats you either need some kind of tow device or multiple people to help move the helicopter because of its weight.

How Do Helicopters Taxi?

Now that we have seen how a helicopter is pushed/pulled or towed around the hanger how do helicopters get from the hanger to the takeoff and landing locations? At some airports, there are designated areas that helicopters can only operate from or they may be restricted to landing and taking off only from a runway, so how do they get to those locations?


Join My Newsletter & Get Great Tips, Information and Experiences To Help You Become a Superb Pilot!

* indicates required
Your Interest: *

How Do Helicopters Ground Taxi?

Ground taxiing is used for helicopters with wheels only. When the pilot pushes slightly forward on the cyclic it tilts the rotor disk forward and creates a thrust vector towards the rear of the helicopter, just like they were accelerating away while in flight. The rearward thrust moves the helicopter forward.

Once the pilot releases the brakes the helicopter will begin to roll forward, this is known as ground taxiing. To turn the helicopter the pilot pushes on the foot pedals to make the tail rotor push the rear of the helicopter left or right, thus swinging the nose in the opposite direction:

Ground taxing works great to help keep debris and rotor wash to a minimum. It requires far less blade pitch to ground taxi, thus the amount of rotor wash produced is far less than if the helicopter was hovering. This is great for taxiing around airports with private and corporate jets parked close by and not peppering them with dust and debris!

How Do Helicopters Hover Taxi?

Hover taxiing is primarily used by helicopters that only have skids, although wheeled helicopters can hover taxi too, especially if they are trying to move around a grassed field etc. Hover taxiing is just what it sounds like, it is when the helicopter is in a hover and moves from point A to point B. Most helicopters hover around 5 – 10 feet depending on their size.

This is how I move my Astar around when I need to taxi from my parking spot to the takeoff point. A hover taxi is done at a typical hover height and at a slow speed and is used to cover only small distances, but it does create a lot of rotor wash and dust when lifting off next to the hanger and other aircraft. With skidded helicopters, there is no other option.

How Do Helicopters Air Taxi?

If the helicopter has to cover a large amount of ground to get to its takeoff point or from its landing point then a maneuver called an Air Taxi is used. For instance, if air traffic control wants them to take off from a runway, the pilot needs to taxi down the taxiway but at an acceptable pace, or if the pilot wishes to get to the airport’s infield for training.

An air taxi is usually completed under 100ft above the ground and up to 40kts. As the pilot approaches the area they wish to land at they will slow down to a hover taxi and then land or hover in that location before departing.

To Finish

Helicopters are moved on the ground using tow vehicles, ground handling wheels, dollies, or their own power. Wheels make it much easier if they are already attached to the helicopter but these add weight and complexity to the helicopter which is not justifiable on the smaller, cheaper machines.

To move around from point A to B helicopters either have to ground taxi or hover taxi. Both have their own benefits but it all depends on the type of helicopter the pilot is flying and the surface on which the helicopter is moving on.

Further Reading

If you found this article helpful may I suggest these other articles too:

Can Helicopters Fly in Fog or Zero Visibility? It Depends!


When flying around and the clouds begin to drop or the visibility starts to reduce this is the time that helicopter pilots need to start thinking about the options and alternate plans they should have previously looked at before the flight began. To be able to fly a helicopter into zero visibility conditions requires a certain kind of helicopter and a certain kind of helicopter pilot.

Most helicopters can fly in zero visibility, but it is the pilot that needs to be proficient. Flying without outside visual reference to the earth’s surface needs extensive training, proficiency, and the correct instruments in the aircraft for the pilot to maintain control of the helicopter.

Having flown helicopters in both conditions of unlimited visibility to zero visibility I can give you a first-hand explanation of how helicopters can fly in zero visibility and what it takes to do it safely.

How Can Helicopters Fly In Zero Visibility?

Technically ANY helicopter itself can be flown into zero visibility conditions but the person controlling it is the most unreliable link in the chain and because of this there need to be certain things in place to ensure the pilot, any occupants on board, and any person on the ground do not get hurt.

In most helicopter flights the pilot/s are flying under VFR – Visual Flight Rules. This means they need to look out of the helicopter’s windows and be able to see the ground and/or horizon to be able to establish which way is up.

For helicopters to fly safely in zero visibility conditions the pilots need to fly under IFR – Instrument Flight Rules. This means the pilot controls the helicopter by sole reference to the aircraft’s instrumentation in the cockpit and is usually under the control of air traffic controllers in an airspace system designed to keep obstacles away from the aircraft. If they are flying out in remote locations, then the pilot is often on their own!

Helicopter pilots get into trouble when they are flying in VFR conditions, they are not IFR trained, and then they get into poor visibility, the cloud ceiling begins to drop, or rising terrain forces the pilot higher and into the cloud. This is known as entry into IIMC – Inadvertent Instrument Meteorological Conditions.

In other words, the weather conditions prevent the pilot from being able to see outside references on the ground and require flight using the helicopter’s cockpit instruments. Depending on the pilot and the location of the aircraft when it enters this IIMC can be the difference of survival or not.

Once airborne and flying in zero visibility conditions is one thing but pilots still need to be able to see the ground to land and take off so when a full zero visibility condition exists it should prevent that flight from taking place. At this time we are as close as is safely possible to zero visibility helicopter operations with the current aircraft technology available.


Join My Newsletter & Get Great Tips, Information and Experiences To Help You Become a Superb Pilot!

* indicates required
Your Interest: *

Helicopters in the offshore oil transportation sector regularly take off in as little as 1/4sm visibility and land at 1/2sm visibility. Having the right helicopter, appropriately trained pilots, and well-designed procedures & policies are what make this operation safe. Without the equipment, training, or procedures then things turn out very different!

Helicopter Equipment Required To Fly In Zero Visibility

Helicopters need to be equipped with a bare minimum of cockpit instruments for the pilot to safely reference when controlling the helicopter in zero-vis conditions. An ‘Instrument Stack’ or ‘6 Pack’ provides the pilot with the bare minimum information to be able to keep the helicopter upright.

This 6 pack consists of:

  1. Attitude Indicator
  2. Altimeter
  3. Airspeed Indicator
  4. Vertical Speed Indicator
  5. Turn Coordinator
  6. Compass or Heading Indicator

Having a 6-Pack is just the starting point and if this is all the pilot had on the helicopter then they will be sweating and working hard if they accidentally ended up in poor visibility! I remember doing my initial instrument training on a Robinson R22 simulator and this is all it had. Trying to fly a twitchy, sensitive helicopter by sole reference to the instruments while trying to tune radio frequencies, look at charts and procedures, and program the GPS would have the helicopter climbing, turning, and banking in seconds! – Not fun!

To be able to safely fly in zero visibility for prolonged periods the pilot needs a little help – This is where automation comes in. The more the helicopter can do for the pilot, the safer it becomes.

The first piece of equipment that is a godsend is a moving map GPS – This helps the pilot maintain awareness of where they are in the world, known as Situational Awareness. Not being able to see outside really confuses a pilot’s ability to know where they are. A good quality moving map displayed in the cockpit is very helpful!

The next piece of equipment is an AFCS – Automatic Flight Control System. Commonly known outside of aviation as an Autopilot, however, that is just one part of the AFCS system. By having the helicopter take over the physical manipulation of the flight controls allows the pilot to tell the helicopter where to go, how fast, and how high.

The helicopter then gets on and does it leaving the pilot to complete other necessary tasks like navigating, talking with air traffic control, and preparing for the next part of the flight – From experience, this is THE most important part to safely flying a helicopter in zero visibility.

For more information on helicopter autopilot systems see the ‘Further Reading’ Section at the end of this article

Advanced Avionics in this Leonardo AW139 Makes Flying in Zero Visibility a Piece of Cake!

The other option is to have a second pilot with you who is doing the physical control manipulation allowing you to focus on all the ‘Other Stuff’. Other additions like a second engine, redundant helicopter systems, and advanced avionics all make flying in zero visibility safer, but are not the bare minimum required to maintain control.

Having a helicopter with the necessary instrumentation and equipment onboard is great, but only if it is working correctly, calibrated, and displaying true. Many of the ‘Bush Rocket’ helicopters that I fly have some or all of the 6-pack but they are not required to be tested and working because my company is a VFR-Only operation.

Having instrumentation that does not display properly is a surefire way to not come out of a reduced or zero visibility condition if one was accidentally entered. Because of this, it is up to the pilot to make sure they turn around or land WAAAY before they get into this situation! This leads us to the next part of safely flying in zero vis:

Helicopter Pilot Training Required To Fly In Zero Visibility

Learning to fly a helicopter is hard and takes months of practice, now take away a pilot’s most powerful sense – sight, and you have a problem. To be able to safely fly a helicopter by sole reference to its instrumentation in zero visibility conditions you need additional and specialized training known as Instrument Training.

Instrument training is designed to train a pilot to correctly scan and interpret the cockpit instrumentation and manipulate the flight controls to maintain safe flight. It might sound easy but as humans, we are used to our balance and ‘seat of the pants’ feelings backing up our sight to tell us how our body is orientated to the ground.

In a hard turn in a car, we feel the centrifugal force pulling us to the outside of the turn, when you have your eyes closed and someone nudges you the body reacts to maintain balance and keep you upright. During instrument training you have to train your brain to ignore these bodily senses and rely just on what the instrumentation is telling you – This is hard, Trust Me!

For non-proficient instrument pilots, not being able to ignore these senses makes them question the information displayed in the cockpit, and will begin to fly according to what their body is telling them, which can be wrong. This is how a pilot who enters a zero visibility condition with no instrument training generally lasts only 20 seconds without outside visual reference before they have allowed the aircraft to enter a dangerous flight attitude, usually resulting in a fatal crash.

My Annual Simulator Training Which Included Around 10 Hours of Instrument Flight

The other area that gets helicopter pilots into trouble is when they think they can fly on instruments but have not done so in a long time. As part of getting a helicopter pilot certificate, each pilot gets some basic instrument training either in a helicopter simulator or by flying in an aircraft using a view-limiting device.

If that pilot has not practiced flying by sole reference to instruments for a very long time and then finds themself ‘Pushing the Weather’ they can find themselves in a situation where they accidentally get into low vis conditions.

A very common scenario is a pilot ‘scud-running’ a valley to get back home and they look down to adjust the radio or GPS and while doing so they allow the aircraft to climb. When they look back up they are in the cloud and panic sets in. Without some composure, clear thinking, and instrument flying proficiency that helicopter is about to enter a very dangerous and possibly fatal chain of events.

To Finish

Helicopters are able to fly in zero visibility provided the pilot has the necessary training and proficiency to maintain control of the helicopter by using its instrumentation. When flying in an area where no obstacles or terrain present a problem then a helicopter can easily fly in zero visibility, only needing around 1/2sm to be able to legally land.

When an untrained or non-proficient pilot accidentally gets into zero visibility conditions the chances of making it out of the situation safely are dramatically low. The key to preventing this is to turn around or land way before the visibility becomes an issue.

The client pressure to continue, take-off, or ‘Get-Home-Itus’ still causes many accidents because pilots have pushed too far into weather conditions that impede safe flight. If the weather is bad there are a few options:

  1. Don’t go
  2. Land if encountered
  3. Get an IFR-certified aircraft and crew

By using the right tools for the job flying in zero visibility is not a problem. However, wrong place at the wrong time with the wrong tools, and the outcome doesn’t look too good!

Further Reading

If you found this article helpful may I suggest a few more for you to read:

Why Do Helicopters Take Off Nose Down?


When a helicopter takes off down a runway it seems to be pointing nose down towards the ground as it accelerates. Why does it do that? Airplanes remain flat and then pitch up when taking off, but helicopters seem to point nose down and then go level as they climb. There must be a specific reason for this.

To accelerate, a helicopter needs to tilt its main rotor system forward to create horizontal thrust. The main rotor system is attached to the fuselage so the whole helicopter also points nose down as it accelerates during takeoff. 5°-15° nose down are typical pitch-down attitudes on takeoff.

When a helicopter’s main rotor is turning it forms a disk and it is this disk that aerodynamically controls how the helicopter moves. Because the rest of the helicopter hangs off the rotor system in flight the fuselage is subjected to longitudinal and lateral attitudes as the helicopter flies.

This article is written in a way to try and leave out much of the tough technical jargon and explain it in a ‘Layman’s Terms’ approach.

How Does a Helicopter Accelerate?

Looking at an airplane it is easy to see what makes it move. It either has a propellor or a jet engine providing thrust to push or pull the aircraft through the air:

On a helicopter, the thrust and lift are created by the rotating disk that is the main rotor system. The downward force of air from the rotor system creates lift to raise the helicopter into the air and in a no-wind hover that is the only force acting on the helicopter as seen on the right:

To move the helicopter in any direction, the rotor disk must tilt and begin pushing air in a lateral direction. This is known as thrust. To accelerate the helicopter forward and gain airspeed the pilot must push forward on the cyclic control which tilts the disk forward. This pushes some air from going straight down to now going towards the rear of the helicopter. This then begins to move the helicopter forward.

The faster forward the pilot wishes to go, the more they have to push on the cyclic, which tilts the disk even more. This then pushes more air rearwards propelling the helicopter forwards.

As the helicopter’s speed increases the amount of nose-down attitude increases as you can see in the picture. The other unwanted side effect of increasing speed is the amount of drag acting on the helicopter increases. These two unwanted attributes are some of the issues helicopter designers fight when they want a helicopter to go faster.

This is why a helicopter takes off nose down. The disk needs to be tilted forwards to create a horizontal thrust component to allow the helicopter to accelerate. Because the main rotor disk is connected to the fuselage this makes the nose drop. It is also the same reason why helicopters look like they are pointing nose up when they are coming into land, except at this point the pilot is decelerating the helicopter by tilting the rotor disk aft.


Join My Newsletter & Get Great Tips, Information and Experiences To Help You Become a Superb Pilot!

* indicates required
Your Interest: *

Helicopter Flat Floor Concept

On smaller helicopters, the main rotor mast is bolted to the helicopter structure at 90°. This means the faster the pilot wishes to go, the more nose down the helicopter has to be for the duration of the flight. I can still remember flying the Schweizer 269 you see in the diagrams above.

That thing flies so slow because of the drag on the canopy that to get anywhere you really had to push the cyclic forward. This led to you practically hanging off your shoulder straps and feeling like you would fall out the front of the helicopter!

For helicopters where the VIP market is a big focus for the helicopter designers the thought of passengers having the feeling of falling out of their seats for a flight would not make a helicopter sell very well!

To get around this the designers create something known as a ‘Flat Floor’ concept and this means that when the helicopter is in cruise, the floor of the helicopter’s cabin is as parallel to the ground as possible. To do this the designers build in an offset into the mounting of the main rotor system which mechanically tilts the main rotor system forward at all times.

Forward Offset Mast on a Leonardo AW139 – Source: Bidgee

As the helicopter lifts into a hover the fuselage will be pointing nose up as the rotor disk sits horizontal to the ground in a no-wind hover. This makes it harder for the pilot to see, especially when coming into land. The AW129 shown above can sit in a hover with as much as 12-13° nose up. For this reason, most of these types of helicopters are flown in clear environments like helipads and airports.

Trying to land a helicopter like this in a tight confined area, with obstacles and uneven ground always made it tricky. I always had to get the crew to keep their eyes wide open to help ensure I was clear of obstacles.

As the pilot accelerates, the fuselage may pitch from 5-12° nose up to 5-10° nose down for a short while but as the helicopter reaches cruise speed, the mast and rotor system will be tilted forward but the fuselage cabin remains flat. When done smoothly and correctly by a good pilot the passengers will very rarely feel this potential rollercoaster type of maneuver. The flat floor during the majority of the flight is what VIP passengers desire.

Source: Fuws260

Controllable Stabilator

On the UH-60 Black Hawk the rear horizontal stabilizer, known as a ‘Stabilator’ can move up and down like an elevator on an airplane. The Stabilator is controlled by the helicopter’s Automatic Flight Control System (AFCS) and constantly moves the trailing edge up and down in flight to help improve flight handling for the pilot.

One of the benefits of the Stabilator is that in a hover or at low forward airspeed it is angled downwards to allow the main rotor wash flowing over it to create lift which pulls the tail upwards slightly, helping to keep the fuselage more horizontal to allow the pilots to be able to see more.

In forward flight, the Stabilitors’ trailing edge rises allowing the forward airflow over it to help push the nose of the helicopter down and create the flat floor concept.

The Horizontal Stabilator is Seen Here at the Rear of the Blackhawk

There is far more to the stabilator than is warranted in this article but that is the Layman’s terms of how it helps keep the helicopter from pointing nose down during flight.

How Do Helicopters Slow Down?

To slow a helicopter the pilot pulls aft on the cyclic which tilts the main rotor disk backwards. The air being moved through the rotor disk now starts to push the helicopter backward as it flies. The longer this position is held, the slower the helicopter becomes until it stops.

It is pretty much the same as accelerating forward. The pilot has to move the cyclic to control the direction in which the helicopters thust points. When in forward flight the thrust vector is pointing forward as the disk is tilted forward.

To slow down the pilot tilts the disk backward and moves the thrust vector to point backward. This coupled with the drag, then begins to slow the helicopter. If the pilot were to hold the cyclic in the aft position the helicopter would slow down, stop and then begin to fly backwards.

To bring the helicopter to a hover the pilot adjusts the cyclic back to the center just as the helicopter comes to a stop. This way there is no horizontal thrust vector moving the helicopter in any direction.

The faster and further the pilot moves the cyclic aft, the faster and more aggressive the helicopter will slow down. One additional function that happens when the pilot moves the cyclic aft is that the rotor disk will catch the airflow like a sail and will cause the helicopter to climb, or balloon up.

To overcome this the pilot must lower the collective to reduce lift so that as the helicopter begins to balloon up the pilot reduces the lift being produced to remain at the desired altitude, or if they are coming into land the pilot manipulates the cyclic to control the airspeed and the collective controls the rate of descent.

To Finish

Helicopters point nose down when taking off because to accelerate from a hover the main rotor disk needs to tilt forward to create a horizontal component of thrust to propel the aircraft forward. The faster the pilot wishes to accelerate, the more the rotor disk needs to tilt forward which means the more nose down the helicopter points.

Offset masts and stabilators help to keep the amount of nose-down attitude to a minimum, but there will always be some degree of nose-down while the helicopter accelerates.

Further Reading

If you found this article helpful you might these ones too:

How Much Do Helicopters Weigh? 20 Awesome Examples


There is a tremendous array of helicopters flying around our planet in every size you can imagine, but how much do helicopters weigh? They need to be as light as possible to fly, but you may be surprised at just how much some of them can weigh!

Helicopters can weigh from 600 lb/275 kg all the way up to 123,400 lb/56,000 kg with every weight and size in between. Helicopters have a Basic Empty Weight and a Maximum Gross Takeoff Weight. The difference in the two is the useful load which includes the crew, passengers, fuel, baggage & cargo.

Helicopters are split into 5 main classes dependent on their weight:-

  • Ultra-Lights: Helicopters weighing up to 254 lb / 1,15 kg Empty Weight
  • Lights: Helicopters weighing up to 3,500 lb / 1,590 kg Maximum Gross Weight
  • Intermediates: Helicopters weighing from 3,500 to 7,000 lb / 1,590 kg to 3,180 kg Maximum Gross Weight
  • Mediums: Helicopters weighing from 7,000 to 12,500 lb / 3,1880 kg to 5,670 kg Maximum Gross Weight
  • Heavies: Helicopters weighing over 12,500 lb / 5,670 kg Maximum Gross Weight

Helicopters range in size from personal single seat models up to the mighty Mil Mi-26 Russian Troop carrier:

HelicopterEmpty WeightLoad Carrying CapacityMaximum Gross Weight
Mil Mi-26
“Halo”
62,170 lb
28,200 kg
61,290 lb
27,800 kg
123,460 lb
56,000 kg
Sikorsky CH-53E
“Super Stallion”
33,226 lb
15,070 kg
40,274 lb
18,270 kg
73,500 lb
33,340 kg
Boeing CH-47F
“Chinook”
24,580 lb
11,150 kg
25,420 lb
11,530 kg
50,000 lb
22,680 kb
Erickson S-64E
“Aircrane”
19,230 lb
8,725 kg
22,770 lb
10,325 kg
42,000 lb
19,050 kg
Leonardo AW101
“Merlin”
23,150 lb
10,500 kg
9,040 lb
4,100 kg
32,190 lb
14,600 kg
Sikorsky S-9215,500 lb
7,030 kg
12,200 lb
4,990 kg
27,700 lb
12,020 kg
Airbus H225
“Super Puma”
11,590 lb
5,260 kg
13,110 lb
5,940 kg
24,700 lb
11,200 kg
Sikorsky UH-60M
“Black Hawk”
12,500 lb
5,675 kg
9,500 lb
4,350 lb
22,000 lb
9,980 kg
Sikorsky S-61N12,340 lb
5,600 kg
6,660 lb
3,020 kg
19,000 lb
8,620 kg
Leonardo AW1397,990 lb
3,620 kg
7,440 lb
3,380 kg
15,430 lb
7,000 kg
Bell 412 EP6,790 lb
3,080 kg
5,110 lb
2,320 kg
11,900 lb
5,400 kg
Sikorsky 76C++7,000 lb
3,180 kg
4,700 lb
2,120 kg
11,700 lb
5,300 kg
Airbus H1555,770 lb
2,620 kg
5,140 lb
2,300 kg
10,910 lb
4,920 kg
Leonardo AW1093,500 lb
1,590 kg
2,780 lb
1,260 kg
6,280 lb
2,850 kg
Airbus H125
“Astar”
2,560 lb
1,160 kg
2,670 lb
1,210 kg
5,230 lb
2,370 kg
Bell 206BIII
“Jet Ranger”
1900 lbs
860 kg
1,350 lb
610 kg
3,250 lb
1,470 kg
Robinson R44
“Raven II”
1,450 lb
660kg
1,050 lb
470 kg
2,500 lb
1,130 kg
Guimbal Cabri G2924 lb
430 kg
616 lb
270kg
1,540 lb
700 kg
Robinson R22 BII880 lb
400 kg
490 lb
220 kg
1,370 lb
620 kg
Mosquito Aviation XE300 lb
135 kg
310 lb
140 kg
610 lb
275 kg
The World’s Heaviest Commercially Made Helicopter – Mil Mi-26

What is Helicopter Empty Weight?

The empty weight of a helicopter is when the helicopter is weighed with all of its equipment attached. Items that are included in the empty weight are:

  • Fuselage, Rotor Systems, Transmissions, Engine/s
  • Avionics
  • Emergency Floats – If fitted
  • Search Lights – If fitted
  • Hoist – If fitted
  • Baggage Hold Extensions – If fitted
  • Auxiliary Fuel Tanks – If fitted

Basically, as the helicopter rolls out of a hanger with no fuel on board is what constitutes its empty weight. It is an important number to know as the rest of the aircraft’s weight and balance builds on this figure.


Join My Newsletter & Get Great Tips, Information and Experiences To Help You Become a Superb Pilot!

* indicates required
Your Interest: *

What is Helicopter Maximum Gross Weight?

A helicopter’s Maximum Gross Weight is the heaviest a helicopter can be to lift into the air. It is set by the manufacturer during aircraft certification and is usually set to keep the aircraft within structural integrity, and/or maintain control during regular or emergency flight maneuvers.

Worlds Lightest Commercially Made Helicopter – Mosquito Aviation’s XE – Source: FlugKerl2

Some aircraft have two maximum gross weights:

  1. Internal Max Gross Weight – This is usually a lower value and is when cargo and passengers are carried inside the aircraft.
    For the Astar AS350 B2 that I fly the Maximum Internal Gross weight is 4,961 lb.
  2. External Max Gross Weight – This is a higher weight as the load is carried via a hook on the belly of the helicopter. Because of this, the pilot can jettison this load in an emergency to instantly reduce the weight to the internal maximum gross weight. The external gross weight is usually limited by engine power and/or structural integrity of the aircraft.
    For the Astar AS350 B2 that I fly the Maximum External Gross Weight is 5,512 lb

What is Helicopters Load Carrying Capacity?

A load-carrying capacity is the difference between its maximum gross weight and its empty weight. This is all the ‘Stuff’ that can be put in a helicopter and the more load-carrying capacity it has, the better it can be utilized. The most common items that make up a helicopter’s useful load are:

  • Flight Crew – Pilot/s, Engineers, Load Masters
  • Fuel
  • Passengers
  • Baggage
  • Cargo

The useful load is what the pilot needs to balance to ensure the helicopter remains under its max gross weight. Many of the smaller helicopters can be limited to how much they can take. For instance, if you put a person in every seat and each person has a 50 lb suitcase there is probably a good chance the pilot will not be able to take full fuel.

This is where the bigger the useful load, the more the helicopter can do.

Pilots usually have to juggle the fuel and passengers to keep the aircraft within limits. If the trip is short enough, the pilot can take less fuel but take all the passengers and baggage in one trip.
If the trip needs more fuel to complete, the pilot may have to elect to do two trips or stop for fuel on the way if it’s available. No matter which option is selected it is always a balancing game of math for the pilot.

How Much Can Helicopters Carry On Their Hook?

When helicopters need to transport bulky, large, or heavy items they are mainly slung under the helicopter. Loads can be attached directly to the belly hook/s or be slung using a length of steel or synthetic rope known as a Shortline or Longline depending on its length.

This Load Contained 20,000 Tree Saplings For Planting

The load on the hook must still fall into the useful load of the helicopter but when a really heavy load is needed it can be done just using the flight crew and a minimum amount of fuel.

The Astar the I fly can realistically lift around 2000lb on the hook, however, the Boeing CH-54 Chinook can lift over 20,000 lb! The bigger the load that needs to be slung, the bigger and more powerful the helicopter needs to be. In our case, we just break the loads down into more manageable sizes and sling them in multiple trips as we do not have a helicopter bigger than the Astar!

The hook and lifting systems on a helicopter are always oversized to ensure a healthy safety margin is maintained and the pilot will always reach the aircraft’s maximum power available or max gross weight before ever getting close to the capacity of the hook or slinging gear.

To Finish

Helicopters come in every size imaginable with every weight in between. Matching the helicopter to the job is paramount but staying within its weight limitations is a must. When a helicopter’s load exceeds its limitations then either the load must be reduced or a bigger helicopter is required.

The larger the helicopter, the more it weighs, the more it costs, the more parts require maintenance and the more fuel it drinks. I could not imagine the hourly flight costs of the Mil Mi-26 but at a purchase cost over $25M, you can bet you will also need very deep pockets to run it!

Further Reading

If you found this article interesting may I suggest these as well: