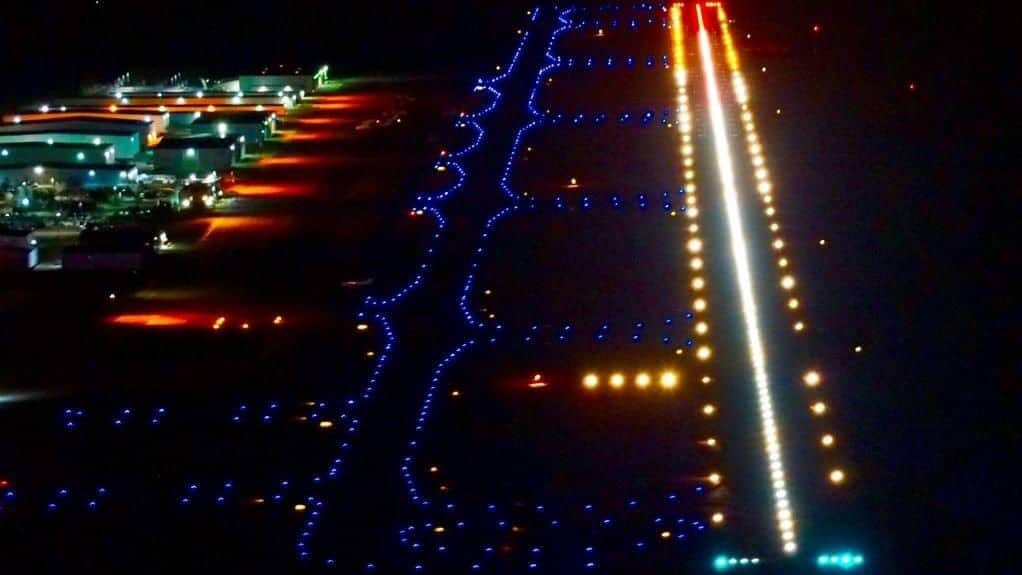
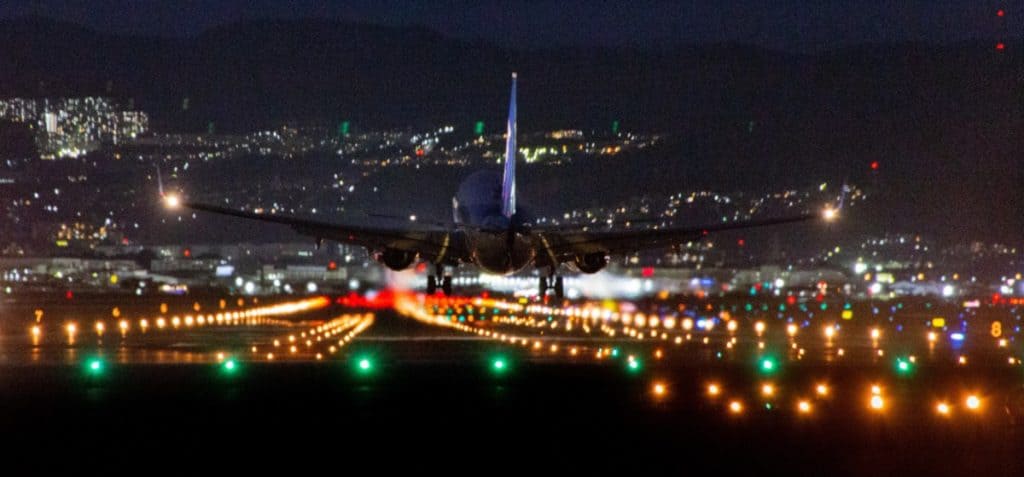
Airports at night time can be quite beautiful and mesmerizing to view as a passenger whether from the air or on the ground. But, they are equally as daunting and complex to navigate as a new pilot. The vast array of colorful lights serves a very particular purpose and is actually a source of vital visual information for the pilots to ensure they stay on the right track.
Runway light colors are used to indicate to pilots where they are currently or are approaching when maneuvering around an airport. Steady illuminated blue and green are used on taxiways, and white, yellow, and red for runways and prohibited areas. Approach lighting systems help pilots line up when landing.
On larger, international airports lighting is mandatory and defined by standards set forth by ICAO (International Civil Aviation Organisation) and then implemented by the regional aviation authority for that country (FAA, EASA, etc.). Having standardized airport lighting across the globe dramatically reduces pilot mistakes, especially when flying into unfamiliar, international airports.
These light systems and colors are an important part of an airport’s infrastructure particularly if the airport is expected to be operational at night or during bad weather that reduces pilot visibility like heavy rain, fog, mist, and dust.
In today’s article, we’ll have a look at what the different colors on an airport signify and how they help pilots in low visibility or nighttime operations. Also, we’ll look at some additional colored visual aids pilots use in day-to-day operations.
Light Colors Found on an Airport:
According to the FAA, each light color on the runway or taxiway needs to provide particular information to the pilot when maneuvering around the airport, when taking off, or when landing.
The most common colors found on major airport runways and taxiways include:
- Green
- Blue
- White
- Red
- Yellow
For airports that do not have instrument approaches attached to them or are small municipal airports the amount and color of lights they have can be none, to very basic. The more lights and colors the airport has, the busier it is and the higher the landing capabilities are for poor weather operations.
We will have a look at each of these lights in detail below:
Taxiway Lights – Blue, Green & Yellow
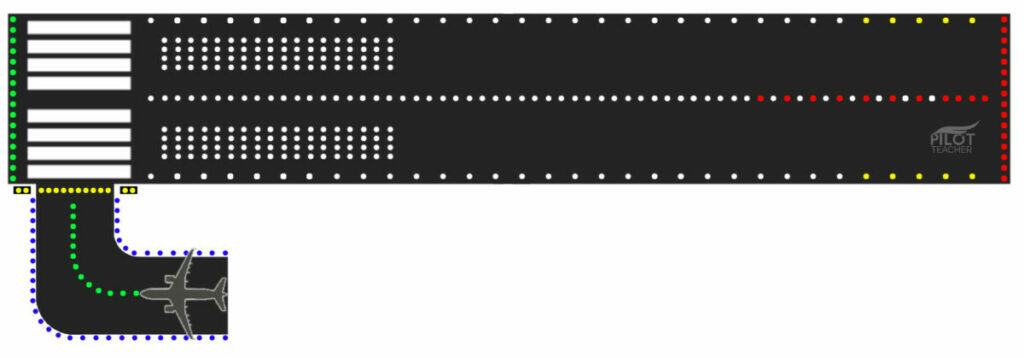
To safely get an airplane from the terminal gate to the runway or vice-versa the taxiways are lit with green and blue lights. This helps pilots instantly differentiate them from runways when on approach to land in poor visibility.
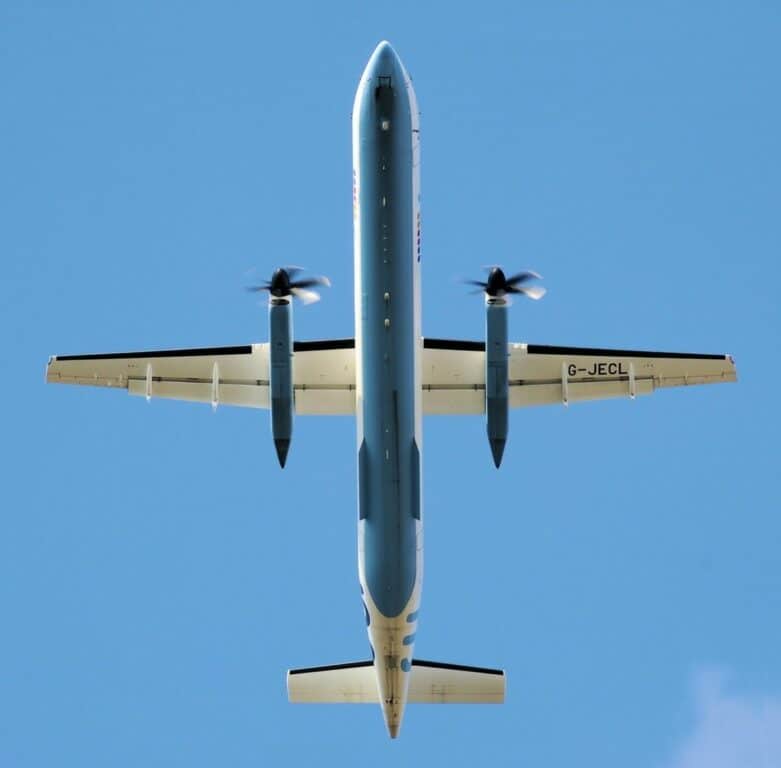
As you can see in the header image for this article it is very obvious to see which is a taxiway and which is a runway once you have read through our explanations. There have been instances when aircraft have landed or almost landed on larger taxiways when the visibility has been incredibly low from thick fog.
Blue Lights
Blue lights signify taxiway edge lighting. These lights are omnidirectional that delineate the edges of taxiways at night or during poor weather and ensure that the pilot does not inadvertently go off the taxiway. They are spaced 50 to 200 feet apart depending on the size of the airport.

Taxing off a taxiway at night or in poor visibility at a major airport can create a logistical nightmare for ground traffic controllers while the airplane is being recovered from sinking into the ground. The blue lights act as a warning to pilots they are about to leave the pavement.
Green Lights
Green-colored lights are used to mark the taxiway centerline that pilots follow when transiting a taxiway.
Taxiway centerline lights are omnidirectional green lights and they are spaced 50 or 100 feet apart to match the blue taxiway edge lights, but on corners or curved areas, they are positioned closer together to help keep the pilots on center.
The taxiway center lights are illuminated at a lower intensity just so pilots on the ground can see them, but pilots on approach to land have a harder time seeing them and not mistaking the taxiway for a runway.
Yellow Lights
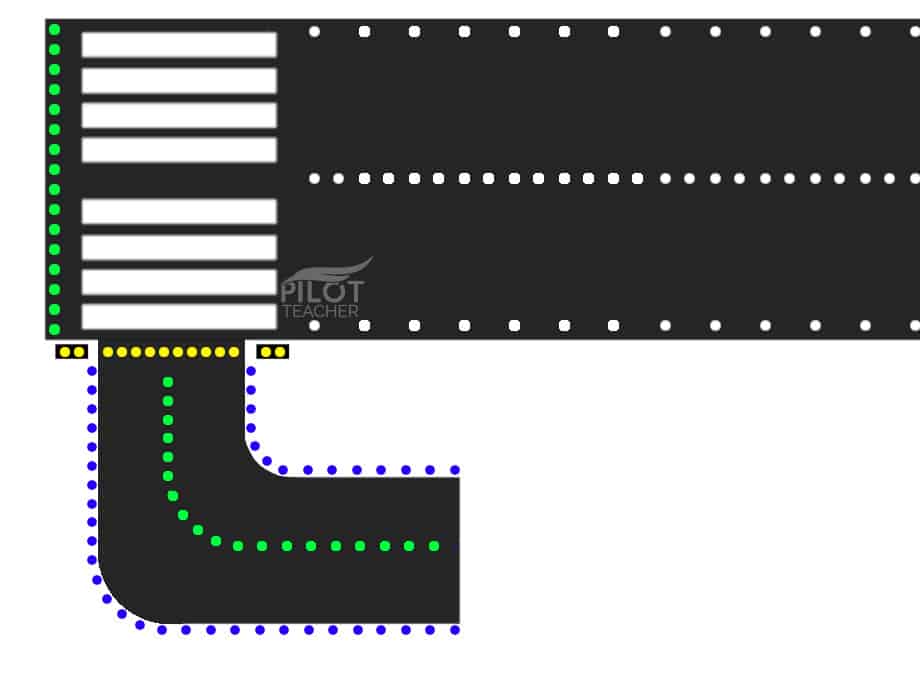
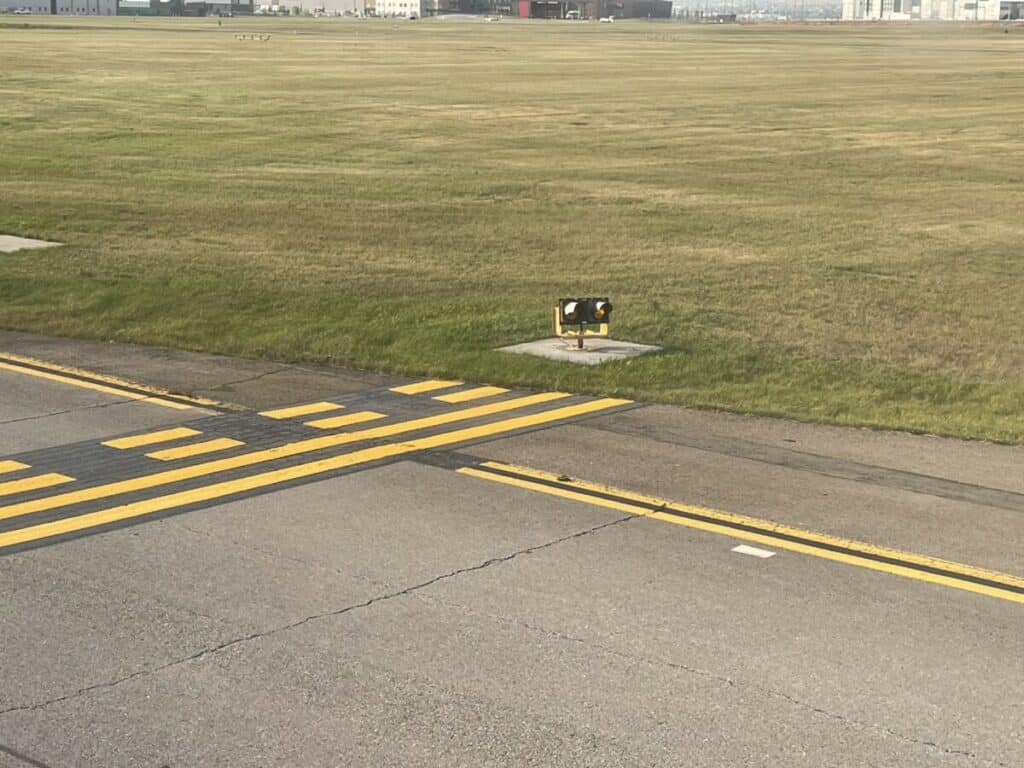
To prevent pilots from accidentally taxiing onto a runway each runway entry point has a ‘Hold Short’ line. Pilots are not allowed to cross this line from a taxiway to a runway without the direct permission of the tower controller.
Depending on the size of the airport the Hold Short line may consist of two alternating flashing yellow lights placed on either side of the taxiway at the hold short line, or may also consist of a line of solid yellow lights across the taxiway, or a line of alternating flashing yellow lights across the taxiway.
This is by far one of the most important sets of lights on the airport surface and yellow is designed to be highly contrasting to the green and blue lights of the taxiway and the white lights of the runway around it.
Learn More…
Try These Articles:
* Can Airplanes Land In Fog? A Pilot Tells All!
* How Big are Aircraft Runways?
Runway Lights – White, Yellow, Green & Red
Runway lights are a combination of white, yellow, red, and green. White is the predominant color to allow pilots to easily distinguish a runway from a taxiway and ensure they land on the right part, especially in very poor visibility.
Runways contain the following lights:
- Runway Edges – White & Yellow
- Runway Centerline – White & Red
- Touchdown Zone – White
- Runway Ends – Green & Red

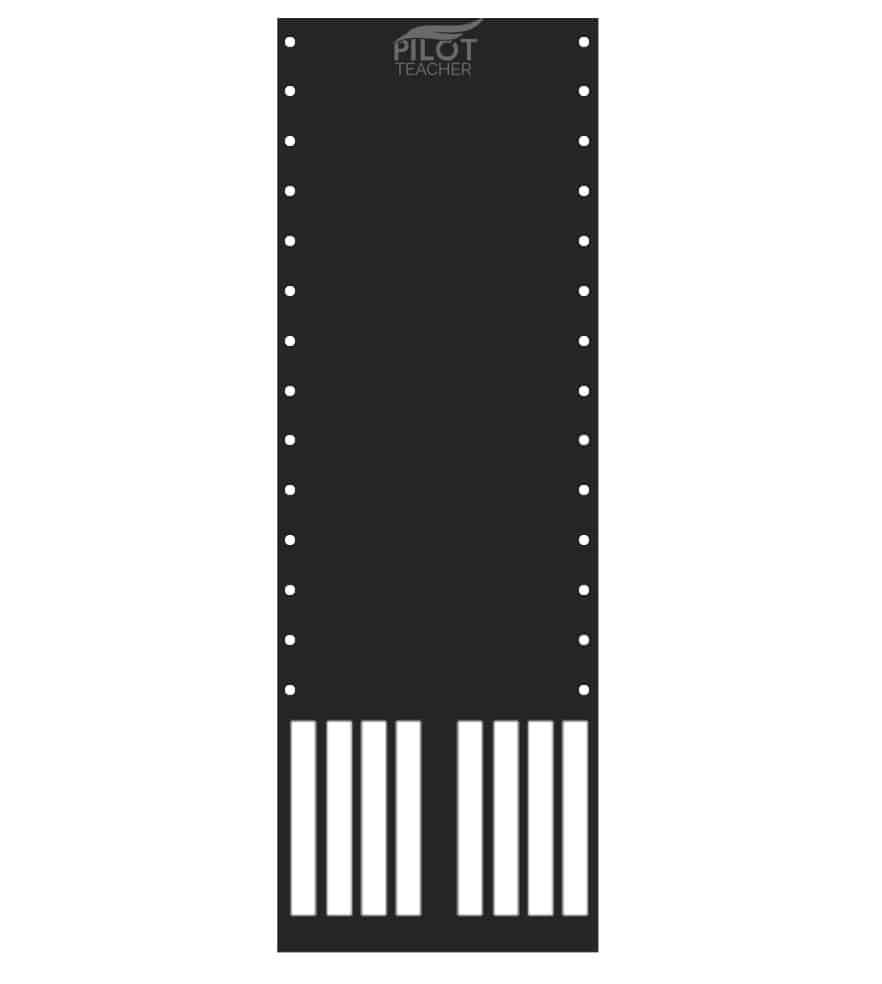
Runway Edge Lights
Runway edge lights are omnidirectional, steady-burning white-colored lights that provide pilots with visual cues regarding where are the edges of the runway.
Runway edge lights are spaced 200 feet apart and they have variable intensity settings such as Low-Intensity Runway Lights (LIRL), Medium-Intensity Runway Lights (MIRL), and High-Intensity Runway Lights (HIRL).
The light intensity is controlled by the air traffic controller or by the pilot using a Pilot-Controlled Lighting System (PCLS).
If you would like to find out more about the PCLS please check out this article:
Can Pilots Turn On Runway Lights From Their Aircraft?
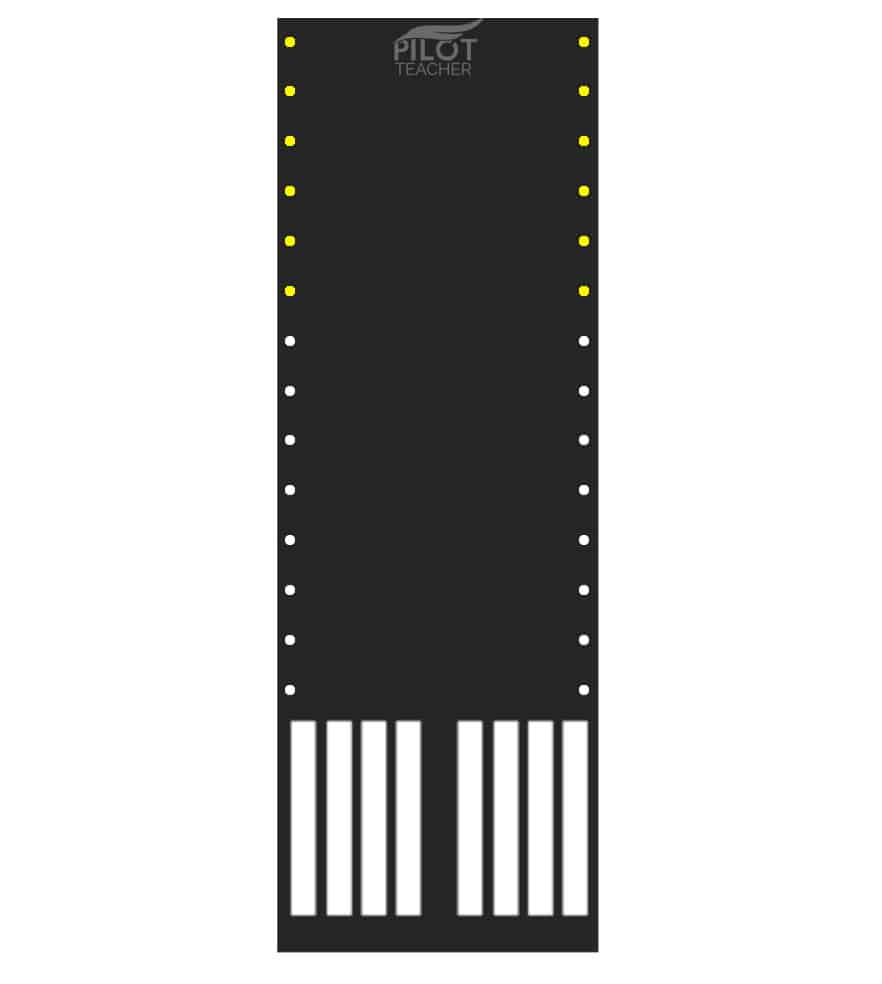
On instrument approach runways, the edge lights change color to a steady yellow in the last 2000 feet or half the runway length, whichever is lesser, to alert the pilots that the runway is ending. This is known as the Caution Zone.
This is a very effective way to discreetly indicate to the pilots how much runway is left if they are dealing with a landing emergency or they landed a long way down the runway.
The yellow lights can only be seen in the direction of landing. To an airplane approaching from the other way all they see are steady-burning white runway edge lights shown above.
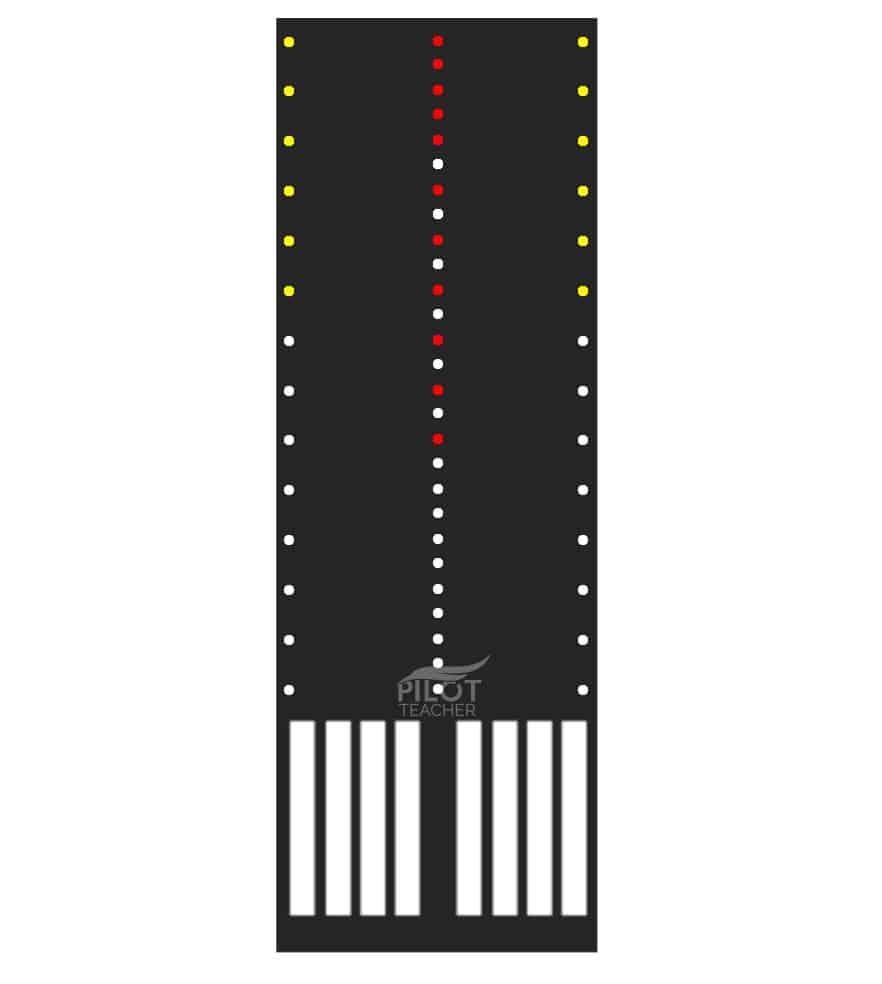
Runway Centerline Lights
Runway centerline lights are steady-burning white-colored lights spaced at 50 foot intervals along the centerline of the runway.
On an instrument runway, the white lights are installed until the last 3,000 feet of the runway, after which the white lights start alternating with red for the last 2,000 feet of the runway, and the last 1,000 feet of the runway have red centerline lights.
Again, this is a subtle way to let pilots know how much runway is remaining.
In addition, the runway centerline lights are usually offset by a maximum of two feet to either the left or right side of the runway centreline paint to prevent the nosewheel of airplanes running over them causing a bumping sound and placing undue stress on the tires and landing gear structure.
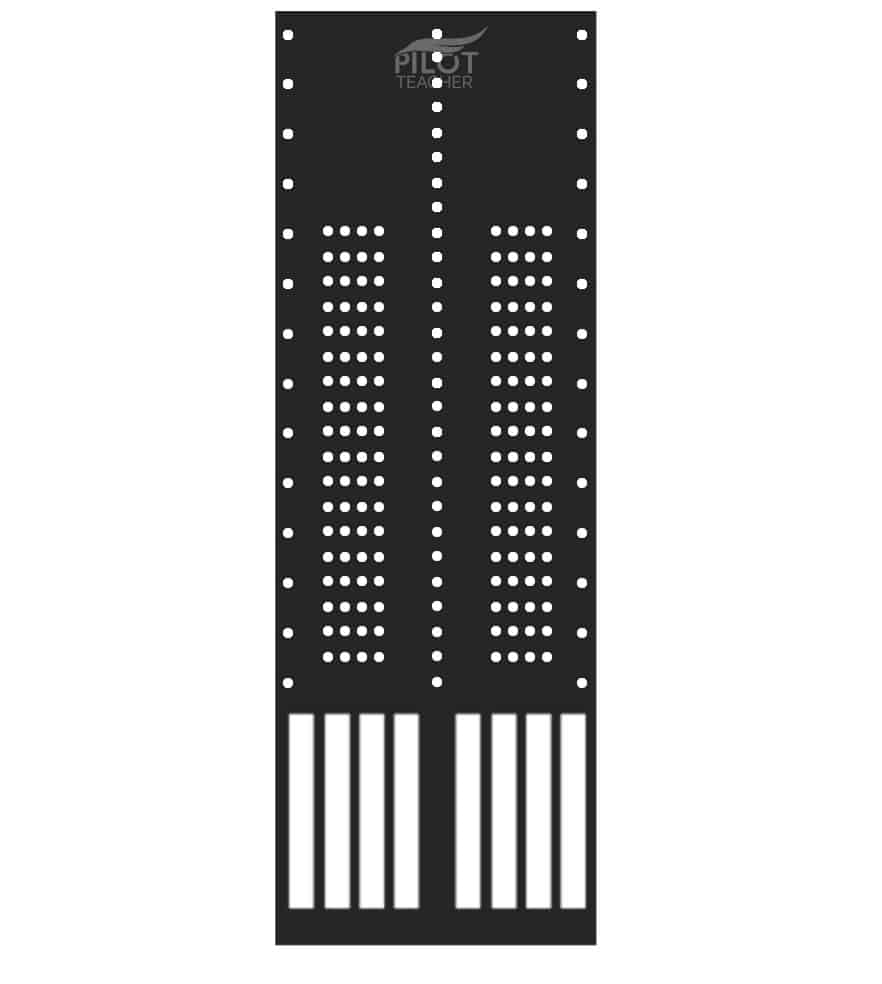
Touchdown Zone Lights
The touchdown zone lighting (TDZL) on an instrument approach runway consists of two rows of transverse white lights placed symmetrically across the runway centerline.
The purpose of these lights is to help the pilots with the landing flare during touchdown in inclement weather conditions.
They can start from 100 feet beyond the runway threshold and extend to 3,000 feet or to the midpoint, whichever is less.
Runway End Lights

To ensure pilots are lining up with the BEGINNING of the runway while on approach to land the runway is equipped with red and green lights across the thresholds.
A row of green lights across the front edge of the runway (The Threshold) shows the start of the runway and a row of red lights across the far end of the runway denotes the end of the runway.
Join My Newsletter & Get Great Tips, Information and Experiences To Help You Become a Superb Pilot!
Approach & Glide Slope Lighting System Colors
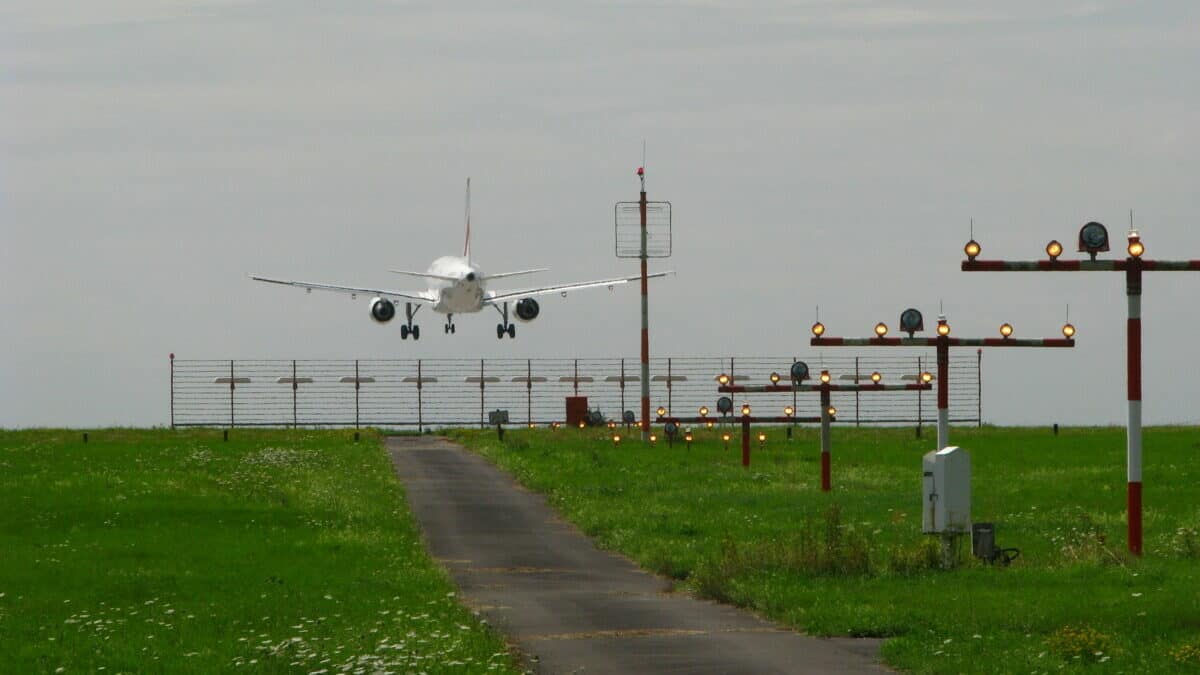
For airports that operate at night, they will be equipped with approach and glide slope lighting systems to help visually guide the pilot down the approach path for the runway. Each runway will have an approach lighting system but the level of lighting complexity increases with the landing limitations for that runway.
For runways that allow aircraft to land in the poorest of visibility conditions, they will have the highest complexity of approach lighting systems, whereas small, municipal airports may have just a basic approach lighting system and /or visual slope indicator.
The two systems are broken up into:
- Visual Slope Indicators
- Approach Lighting Systems
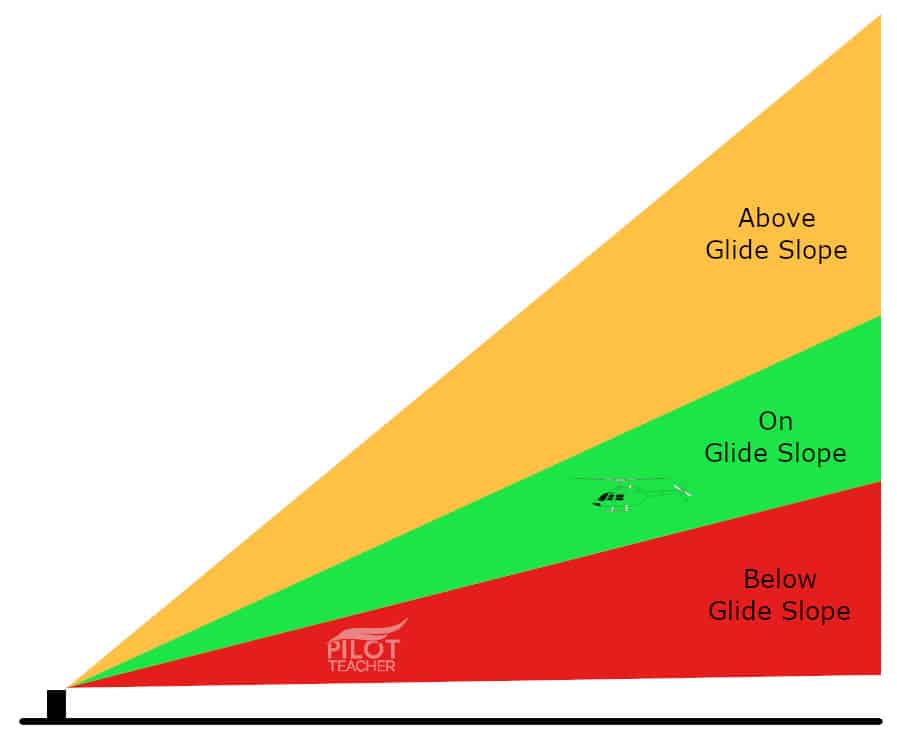
1. Visual Slope Indicator Colors
This is exactly what it sounds like. It is a series of lights that visually show the pilot if they are on the correct approach angle (known as glide path) to the runway. Most runways have a 3° approach slope that is free of obstacles for the pilots to funnel down to the touchdown zone on the runway.
These visual slope indicators will show the pilot if they are on the 3° glide slope, or above it, or below it. They are very handy to ensure the pilots approach the runway within the designated obstacle-free safe zone.
There are two types of Visual Slope Indicator:
- VASI – Visual Approach Slope Indicator
- PAPI – Precision Approach Path Indicator
VASI:
The VASI uses two light bars placed on the left side of the runway. To stay on the correct 3° glide slope the pilot needs to stay seeing Red over White. If the pilot does not descend quickly enough and goes above the recommended glide slope they will begin to see the top light bar also go white.
If the pilot descends too fast and drops below the recommended glide slope they will begin to see both light bars show red.
Below Glide Slope
On Glide Slope
Above Glide Slope
When learning to fly, a simple Memory Rhyme is taught:
White, White = Fly All Night
Red Over White = You’re Alright
Red, Red = You’re Dead
When lined up correctly on the VASI it will ensure obstacle clearance within +/-10° on either side of the extended runway centerline out to 4 miles from the runway threshold. At night VASI lights are visible out to 20nm and 3-5nm during the day.
Tri-Color VASI:
Tri-Color VASIs are a common sight at heliports and smaller municipal airports. They work by projecting 3 light colors from a single transmitter allowing them to be installed in a smaller location.
When on the correct glide slope the pilot will see green, when above slope they see yellow, and below they see red.
Because the light emanates from a single transmitter the light projection can also be directed out horizontally at any angle from the transmitter that obstacle clearance allows.
This makes them a perfect visual slope indicators for rooftop helipads, or downtown heliports for example where safe routes in and out of the helipad were surveyed.
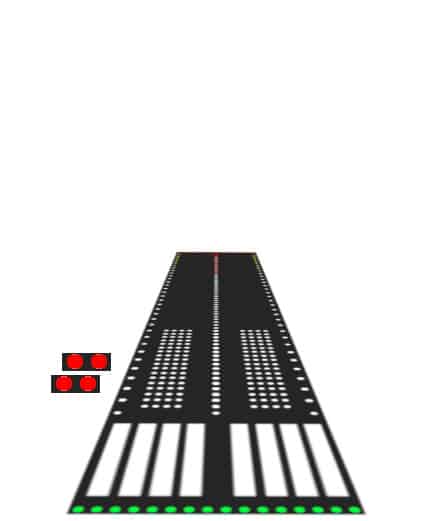
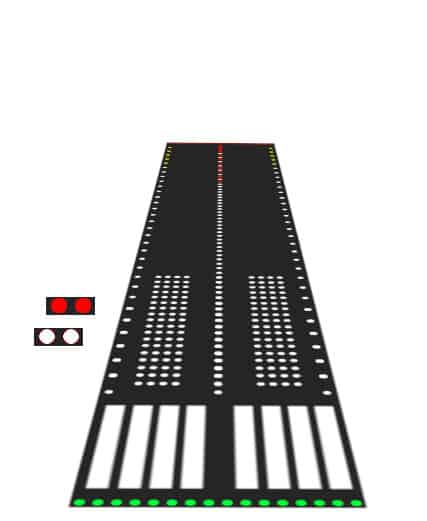
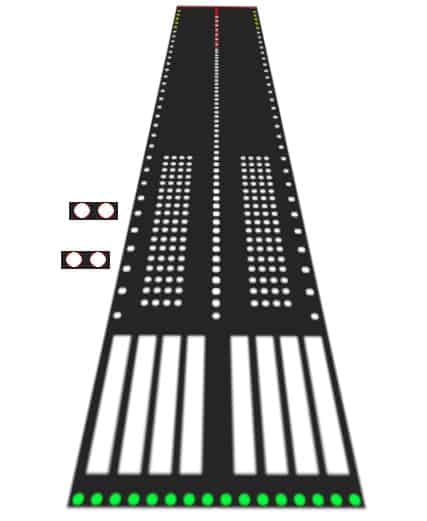
PAPI:
PAPI is short for Precision Approach Path Indicator. It consists of a single row of four lights usually located on the left side of the runway, or on both sides at major airports that are prone to heavy fog. They are visible from 20 miles during the night and 5 miles during the day and like the VASIs, provide vertical guidance to the pilots while on approach.
The PAPI’s individual bulbs change color between red or white depending on the aircraft’s position relative to the 3° glide path:
- If the aircraft is too high, the PAPI’s will display all White
- If the aircraft is slightly too high, the PAPI’s will display all 3 White and 1 Red
- If the aircraft is On glide slope, the PAPI’s will display all 2 White and 2 Red
- If the aircraft is slightly too low, the PAPI’s will display all 1 White and 3 Red
- If the aircraft is too low, the PAPI’s will display all Red
High Above
Glide Slope
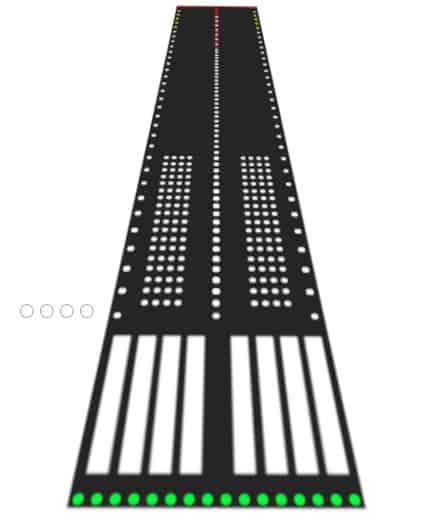
Slightly Above
Glide Slope
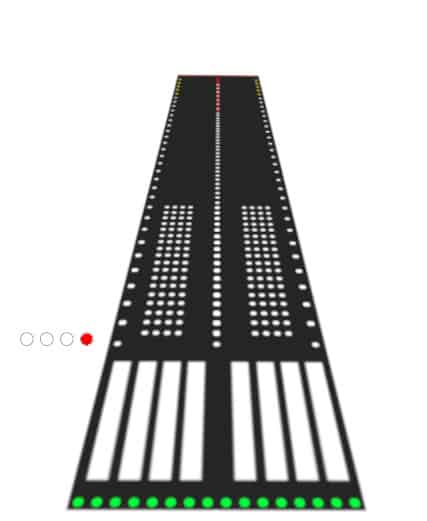
On
Glide Slope
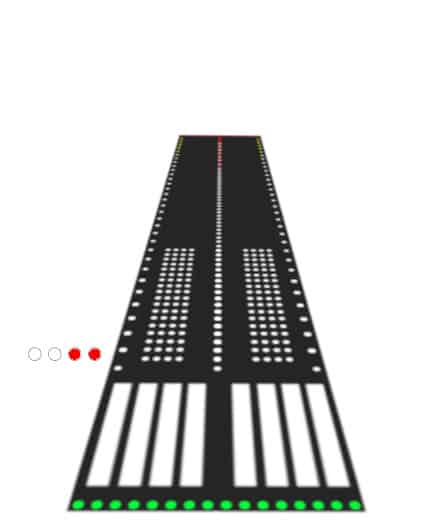
Slightly Below
Glide Slope
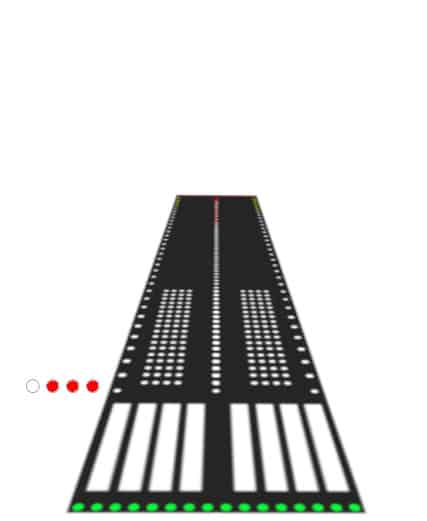
Below
Glide Slope
Pilots use the same ‘White, White, Fly All Night/Red, Red You’re Dead’ rhyme for flying the PAPIs too. The best part of the PAPIs is they give the pilot a little more precision while on approach and this is why you will find these installed by every major runway around the world.
2. Approach Lighting System Colors
All airports that are used by aircraft at night will have some form of approach lighting system to help the pilots stay on the centerline while using the PAPI or VASI to maintain their descent path. The busier and more capable instrument runways will have more complex approach lighting systems like the ALSF-1 or ALSF-2, while smaller municipal airports will be more likely to have the MALSR or ODALS.
You will most likely to have seen the structures for each light crossing over roads and areas outside of the airport perimeter. This is because these lighting systems can fan out to as much as 3,000 feet from the end of the runway.
ALSF-2
ALSF-1
MALSR

ODALS
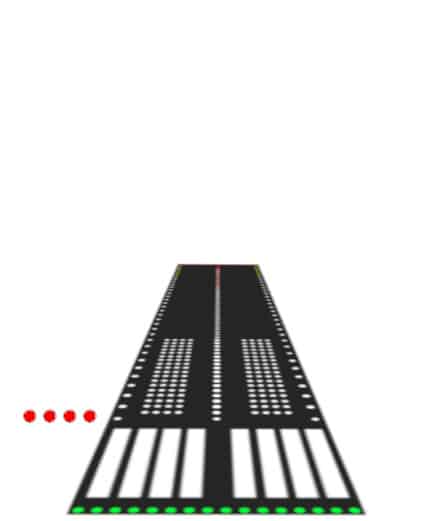
ALSF-2
High-Intensity Approach Lighting System with Sequenced Flashers
Used on the runways with the lowest landing visibility minimums. This complex set of white and red lights stretches out to 3,000 feet in front of the runway threshold. As the aircraft crosses over the first full runway width row of white lights this indicates the pilot is roughly 2,000 feet or 1/3 mile from touchdown.
By following the red sets of lights on either side of the approach lighting center lights the pilots will know they are on track and lined up horizontally with the touchdown zone of the runway. On approaches blanketed in thick fog, the pilots may not see these red lights until several seconds before touchdown.
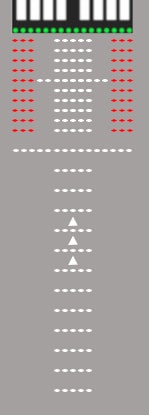
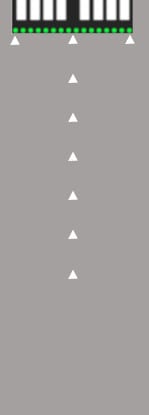
ALSF-1:
Approach Lighting System with Sequenced Flashers
By far the most common approach lighting system used around the world at airports that contain runways with a non-precision instrument approach procedure.
When on glide path the pilot should be flying directly down the center using the ‘Line Tracing’ strobe lights (Triangles) and upon crossing the white row of lights known as the ‘Roll Bar’ they should also be roughly 100 feet above the ground and 2,000 feet or 1/3 mile from touchdown.
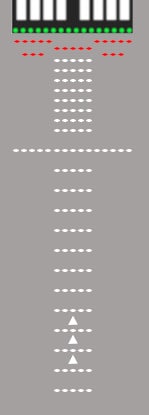
MALSR:
Medium Intensity Approach Lighting System with Runway Alignment Indicator Lights
A common site at many older international airports. This approach lighting system used to be the benchmark until technology evolved allowing for airplanes to land in much worse visibility conditions.
Consisting of just an array of steady-burning white lights and a sequence of white strobe lights designating the runway centerline, this is by far one of the simplest systems out there.
Stretching out to 2,400 feet from the start of the runway, this lets pilots know they should be roughly 100 feet above touching down when crossing the horizontal row of 15 steady-burning white lights.
ODALS:
Omni-Directional Approach Lighting System
When flying into small unmanned and municipal airports this is by far the most common approach lighting system you will see. Like the MASLR, it too uses just white lights but consists of just flashing/strobing lights.
The two lights on the corners of the threshold flash as a pair and the row of white centerline line lights flash in sequence toward the runway. When lined up for approach on the runways’ extended centerline it is very easy to stay on target with the system.
This lighting system is common with the PCLS (Pilot Controlled Lighting System) mentioned above.
Airport Beacons – White, Yellow, Green & Red
Airport beacons are also called Rotating Beacons or Aeronautical Beacons and their primary purpose is to identify the type of airport and its location to a pilot in the distance. It is mounted on a tower or at some heightened place so that it is prominent from every direction.
As a pilot flying at night, an airport can become lost in the vast sea of city lights, especially if the pilot is flying under visual conditions (VFR) and is on the opposite side of the city. The rotating beacon is also a high-intensity light so it helps to stand out.
When looking for the airport at night I will hone in on the rough location of the airport then look for the brightest, slow-flashing light. The color of that light then tells me if I’m looking at the correct airport and not a military air base or similar.
The lights of an airport beacon inform the pilot about the type of airport.
| Light Color | Type of Airport |
| Alternating White and Green | Lighted Civilian airport |
| Alternating White and Yellow | Lighted Water airport |
| Double White Flashes followed by a Green | Lighted Military airport |
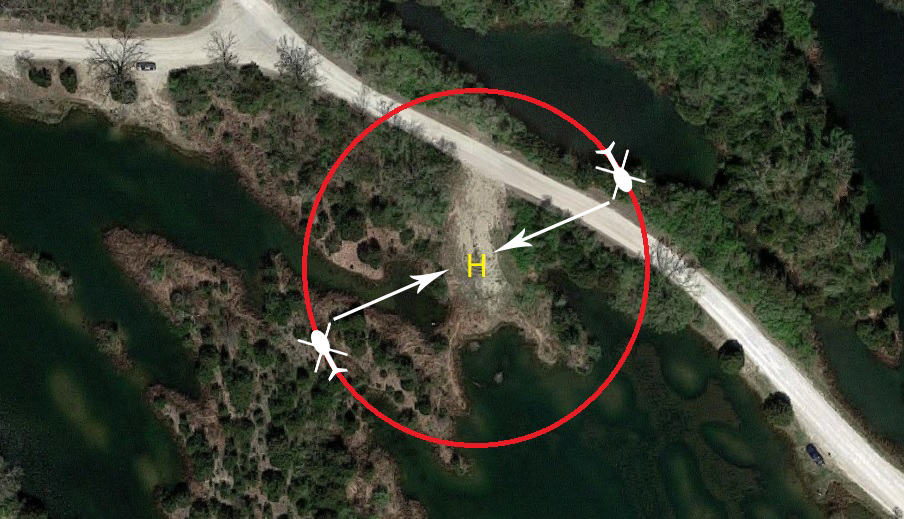
| Alternating Green, White, and Yellow | Lighted Heliport |
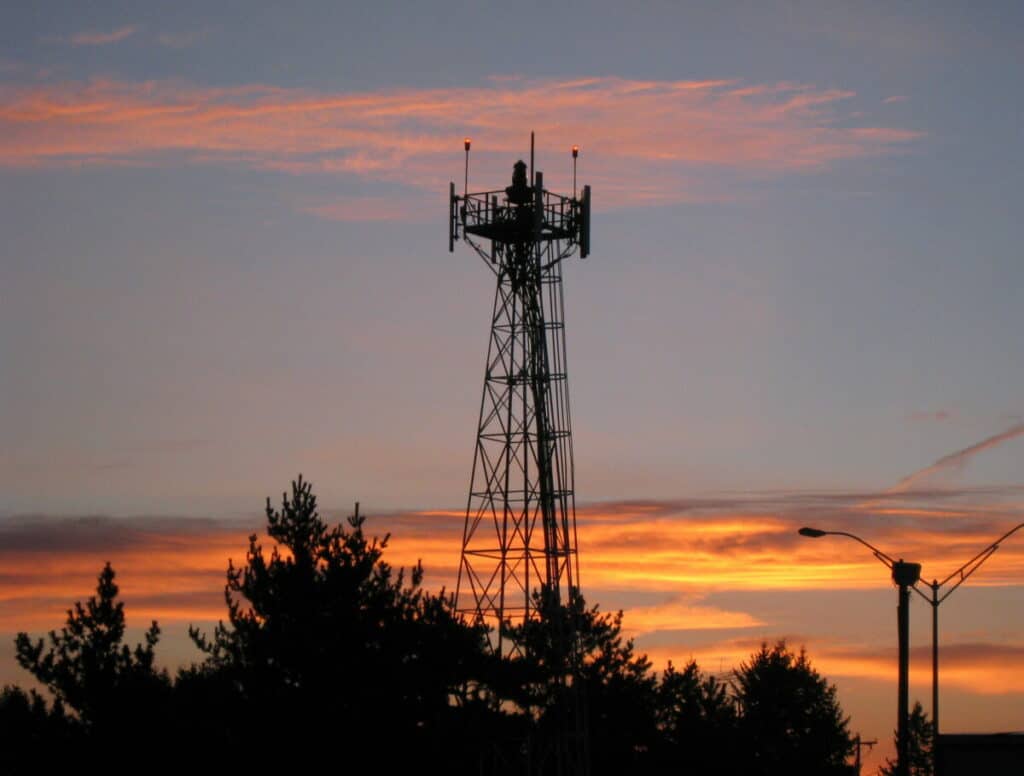
In addition to rotating beacons are obstruction lights. Any structure that is over 150 feet (45m) tall and within 1.8 miles (3000m) of a runway must be lit with some form of obstacle light beacon. Most are a steady-burning, omnidirectional red lights attached to buildings, towers, antennas, and structures within close proximity to the airport.
As obstructions get taller and larger, multiple sets of lights may be required up the sides of the obstruction with the addition of flashing red or white strobe lights, especially when taller than 200 feet (60m).
Learn More…
Try These Articles:
* Finding the Right Runway: How Do Pilots Know Where To Land?
* How Do Pilots See At Night? Everything You Want To Know!